


-12-
ASSEMBLY
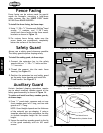
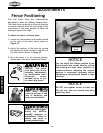
Fence Facing
Fence facing can be custom made for special
needs—for example, mounting a hold-down
roller systems like the
SHOP FOX
®
Model
W1105 Green BOARD BUDDIES
®
.
To install the fence facing, do these steps:
1. Using
1
⁄4"-20 x
5
⁄8" Countersunk Phillips
®
head
screws,
1
⁄4" washers, and
1
⁄4"-20 T-nuts;
install each fence facing to the fence mount
brackets as shown in Figure 12.
2. For custom fence facing, make sure the
screw heads are countersunk completely
below the surface of the fence face.
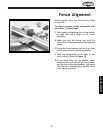
Always use a safety guard whenever possible.
The safety guard improve shaping safety.
To install the safety guard, do these steps:
1. Connect the extension bar to the safety
guard with two
1
⁄4 "-20 x
3
⁄8 " bolts and the
1
⁄4 " hex nuts.
2. Thread the support into the main fence
housing. See Figure 13.
3. Position the extension bar and safety guard
on the main fence housing and install the
T-lock handle. See Figure 13.
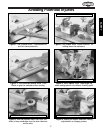
Figure 12. Installing fence facing.
Safety Guard
Figure 13. Threading lock handle onto the
guard assembly.
Extension
Bar
Main
Fence
Housing
T-lock
Handle
T-nut
Support
Safety
Guard
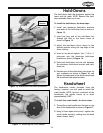
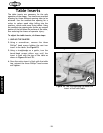
Figure 14. Auxiliary wooden guards.
Auxiliary Wooden Guard
Guard Assembly
#10 Wood Screws
Auxiliary Guard
Certain freehand shaping procedures require
you to attach auxiliary wooden guards to the
safety guard assembly as shown in Figure 14.
To make and install auxiliary wooden guards,
do these steps:
1. From
1
⁄2" wood stock, measure and cut one
front wooden guard at 6" long, and two side
guards at 2
1
⁄2" long.
NOTE: Guard height depends on the thickness
of the material you are shaping. If using a
template attached to the workpiece, be sure
to include template height for the overall
height.
2. Secure the auxiliary wooden guards to the lip
of the guard assembly with six #10 wood
screws.