


-28-
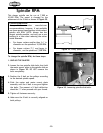
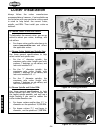
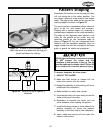
To set up the fence for partial edge removal
or profiling an edge, do these steps:
1. Loosen the lock handles on the side of the
fence mount.
2. Turn the adjustment knob located on the
back of the fence mount and adjust the
infeed fence until the workpiece contacts
the cutter at the desired location.
3. Tighten the lock handle located on the side
of the fence mount to lock the fence into
position.
4. Adjust the outfeed fence so that it comes
into alignment with the infeed fence as
shown in Figure 44.
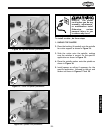
5. Now place a straightedge against both faces
of the fence to check alignment. Once they
are both in alignment, make sure both lock
handles are tightened.
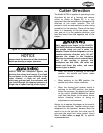
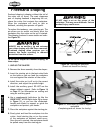
Always feed the wood against the rotation of
the cutter as shown in Figure 45. Another way
to conceptualize this is to always feed the wood
into the cutter so that the cutter is pushing
against the direction of feed. Never feed wood
in the same direction as the cutter rotation.
This is called a “climb cut” and is extremely
dangerous.
Also, examine the grain on the side edge of the
board. Whenever possible, run the board so the
shaper cutters are cutting with the grain as
shown in Figure 44. This will minimize the
chance of tear out.
Figure 44. Fence setup for partial-edge
removal operations
(Guard Removed For Clarity).
Figure 45. Sequence for shaping an edge
around a workpiece
(Guard Removed For Clarity).
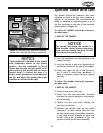
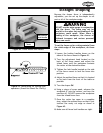
OPERATIONS
ALWAYS use the aid of a jig when shaping
small or narrow workpieces. A jig will reduce
the chance of your hands coming into
contact with the cutters. Failure to follow
this warning may result in serious personal
injury.