


-29-
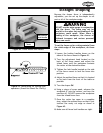
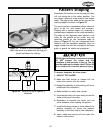
Rub Collars
When shaping workpieces that have irregular
shapes, rub collars are a necessity. There are
two types of rub collars: solid and ball bearing.
They are available in various diameters and can
be purchased individually or as sets as shown in
Figure 46. Some examples of when you would
use a rub collar are raising arched or tombstone
door panels, round table tops, or any other cut
that needs to have its depth of cut limited.
Refer to the set up examples below.
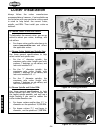
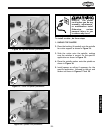
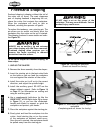
There are three set up positions for rub collars:
1.
ABOVE THE CUTTER as shown in Figure 47.
This setup is the safest and produces the
most consistent results. The only drawback is
that the cut is on the underside of the
workpiece, out of view of the operator.
However, if the workpiece lifts off the table,
you simply run it through a second time to
finish the cut.
2.
BETWEEN TWO CUTTERS as shown in Figure 48.
This setup has the advantage of making two
profile cuts in a single pass. Although you
have a rub collar beneath a cutter, this setup
is safer than the previous setup. Any lifting of
the workpiece will still cause the cutter to
make an uneven cut. A second pass will
correct the profile on the bottom edge, but
the top profile will still have the gouge from
lifting the workpiece into the cutter.
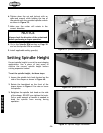
3.
BELOW THE CUTTER as shown in Figure 49.
This setup allows the cut to be viewed by the
operator; however, it is also the most
dangerous. Any slight lifting of the workpiece
will cause the cutter to make too deep of a
cut. There is also an increased chance of
kickback.
WE DO NOT RECOMMEND SHAPING WITH A
RUB COLLAR BELOW THE CUTTER!
Figure 46. Rub collar set.
Figure 47. Rub collar mounted above cutter.
Figure 49. Rub collar mounted below cutter.
Figure 48. Rub collar mounted between two
cutters.
Below
NOT RECOMMENDED
Between
Above
OPERATIONS