


ASSEMBLY
-14-
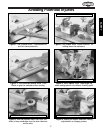
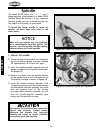
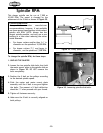
Figure 18. Threading drawbar into spindle.
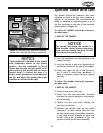
Figure 19. Spindle and guide pin alignment.
Spindle
The Model W1702 comes with
1
⁄2",
3
⁄4", and 1"
shaper spindles. Also available is a Model D3392
Optional Router Bit Spindle. It is very important
that any spindle you use, is seated securely into
the shaper so that safety is maintained.
To install the shaper spindle or router bit
spindle, do these steps every time in the
order below:
1. UNPLUG THE SHAPER!
2. Thread one end of the drawbar into the bottom
end of the desired spindle as shown in Figure
18, approximately 10-15 turns until tight.
3. Insert the spindle/drawbar assembly into the
spindle cartridge from the top side of the table.
See Figure 19
4. Observe and make sure the spindle keyway
on the spindle lines up with the guide pin on
the spindle cartridge as shown in Figure 19.
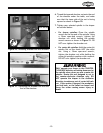
5. Lower the spindle/drawbar assembly until
the guide pin splines with the spindle keyway
and the spindle/drawbar assembly fully seats
into the tapered bore of the spindle
cartridge. When correctly installed, you will
feel the spindle/drawbar assembly seat
snugly with the spindle cartridge.
NOTICE
Make sure you remove any rust inhibiting
oil or contamination from the spindle, the
drawbar, and the spindle cartridge mating
surfaces before you install spindles.
Make certain the spindle keyway and pin are
aligned and properly seated before
tightening the drawbar nut. Improper
assembly can create an unsafe condition
and possibly injure the operator.