


Page 9SKU 47158
For technical questions, please call 1-800-444-3353.
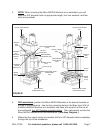
7. To turn the machine on/off, and adjust the rotational direction of the Chuck
(part #132); turn the Switch (part #125) from its “OFF” position to its “FORWARD”
position to turn on the machine and for a clockwise rotation of the Chuck. Turn
the Switch from its “OFF” position to its “REVERSE” position to turn on the ma-
chine and for a counterclockwise rotation of the Chuck. To turn off the
machine, turn the Switch to its “OFF” position.
(See Figure B, and Assy. Diagram.)
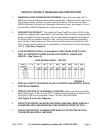
8. To adjust the speed at which the Chuck (part #132) rotates; First set the
High/Low Knob (part #124) until the letter “L” appears on its dial so that the Mirco
Mill/Drill Machine begins running at its low speed range (100-1,000 RPM). Turn
the Machine on. Note: Adjusting the High/Low Know (part #124) until the letter
“H” appears on its dial, will run the machine at its high speed range (100-2,000
RPM). Once the HIGH or LOW speed range has been set, use the Variable
Speed Knob (part #122) to fine-adjust the RPM at which the Chuck rotates.
NOTE: It is recommended to use a higher speed for softer materials or small
holes. Use a lower speed for harder materials and larger holes. (See Figure B,
and Assy. Diagram.)
OPERATING INSTRUCTIONS
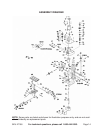
NOTE: For additional references to the parts listed below, refer to the Assembly
Diagram on page 14.
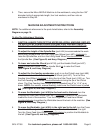
1. CAUTION: Make sure the Switch (part #125) on the Micro Mill/Drill Machine is in
its “OFF” position. Then, plug the Power Cord/Plug (part #128) into the nearest
120 volt, grounded, 3-prong electrical outlet. (See Figure B, and Assy. Dia-
gram.)
2. Check to make sure the Handle Shaft (part #87) is in its full “UP” position.
(See Figure B, and Assy. Diagram.)
3. Place the workpiece on the Worktable (part #105) and, if possible, firmly secure the
workpiece to the Worktable with clamps (not provided).
(See Figure B, and Assy. Diagram.)
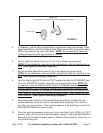
4. Insert the shank of the drill bit/cutting tool (not provided) all the way up into the
Chuck (part #132). Then, use the Chuck Key to tighten the Chuck onto the drill
bit/cutting tool. NOTE: There are three tightening/loosening holes in the Chuck.
Make sure to use the Chuck Key in all three holes.
(See Figures B, and C.)
REV 08/03