


Page 6SKU 47158
For technical questions, please call 1-800-444-3353.
UNPACKING
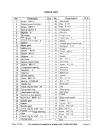
When unpacking, check to make sure all the parts shown on the Parts Lists on pages 12
and 13 are included. If any parts are missing or broken, please call Harbor Freight Tools
at the number shown on the cover of this manual as soon as possible.
CLEANING, ASSEMBLY, AND MOUNTING INSTRUCTIONS
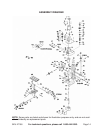
NOTE: For additional references to the parts listed below, refer to the Assembly
Diagram on page 14.
To Clean The Micro Mill/Drill Machine:
1. When manufactured, the Micro Mill/Drill Machine has a special rust-proof coat-
ing applied to its outer parts and should be removed prior to use. To remove the
coating, use a clean cloth and a mild solvent. Then, lubricate all moving parts
with a premium quality, lightweight machine oil.
To Assemble The Micro Mill/Drill Machine:
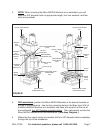
1. The Lifting Hand Wheel, Longitudinal Feed Hand Wheel, Cross Feed Hand
Wheel, and Fine Feeding Hand Wheel (parts #97) must be assembled prior to
using the Micro Mill/Drill Machine. The four Wheels are each identical in size and
shape, and must be properly attached to the Worm Shaft (part #61), the Lifting
Screw (part #95), and the two Lengthways Screws (part #111).
(See Figure B, and Assy. Diagram.)
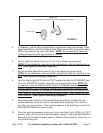
2. To attach the four Wheels (parts #97) to the Micro Mill/Drill Machine, insert one
wheel each onto the end of the Worm Shaft (part #61), the Lifting Screw (part
#95), and the two Lengthways Screws (part #111). Then firmly secure each
Wheel, using one Washer (part #67), and one Top Nut (part #68).
(See Figure B, next page, and Assy. Diagram.)
To Mount The Micro Mill/Drill Machine On A Workbench:
1. CAUTION: Make sure the Micro Mill/Drill Machine is mounted on a flat, level,
sturdy, workbench surface capable of supporting the weight of the Micro Mill/Drill
Machine, additional tools, accessories, and the workpiece.