


For technical questions, please call 1-800-444-3353;
Troubleshooting section at end of manual.
Page 11SKU 55167
ASSEMBLY
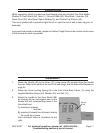
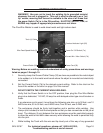
1. Attach the Handle (30) to the Cover (31) using screw (29) inserted from the Handle
top-rear. Refer to the photo at the top of the next page, and the Assembly Diagram on
page 24.
2. Attach the Cover Locking Spring (8) to the front of the Base Frame (14) using the
supplied Machine Screw (42), Washer (40), and Nut (41).
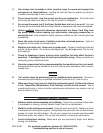
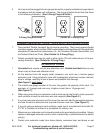
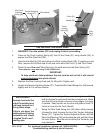
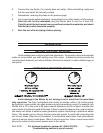
3. Attach the handle to the Face Shield (38)
by lining up the two rectangular tabs on the
handle with the corresponding holes in the
face shield and
1) pressing it upwards
and then
2) pressing it forward from the back, locking
the round tab in place.
See numbered steps in illustration to the
right.
UNPACKING
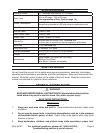
When unpacking, check to make sure the following parts are included: Flux Wire Welder,
Shade #10 Face Shield (38), Torch (1), Ground Cable (33), Wire Brush / Hammer (39),
Power Cord (32), Wire Spool, Spare Welding Tip, and Contact Tip Wrench (43).
This unit is packed with a protective light film of oil, wipe the unit of with a clean rag prior to
assembly.
If any parts are missing or broken, please call Harbor Freight Tools at the number on the cover
of this manual as soon as possible.
Handle
Face
Shield
Round
Tab