


SKU 91146 For technical questions, please call 1-800-444-3353. PAGE 23
INSPECTION, MAINTENANCE, AND CLEANING - WELDING GUN
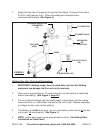
1. WARNING! Make sure the Power Switch (10) on the Welding Machine is
in its “OFF” position. Unplug the Power from its electrical outlet, and allow the
Welder to completely cool before performing any inspection, maintenance, or
cleaning procedures. Note: Always ground the contact tip to insure that there is
no residual energy in the Welder.
2. Before each use: Inspect the general condition of the Welding Gun. Check for
damaged electrical wiring/gas hose, loose connections, cracked, burnt, or broken
parts, and any other condition that may affect its safe operation. If abnormal
noise or vibration occurs, have the problem corrected before further use.
Do not use damaged equipment.
3. Before each use: Clean welding spatter from the inside of the Gas Nozzle
(100A) and spray with an anti-spatter fluid.
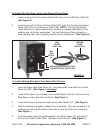
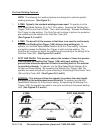
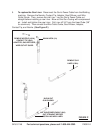
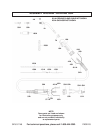
4. To replace the Gun Contact Tip: Cut off the welding wire at the Contact Tip
(90A). Remove the Nozzle. Remove the old Contact Tip, and install a new
Contact Tip. Then, replace the Nozzle. (See Figure O.)
CONTACT TIP (90A)
NOZZLE (100A)
FIGURE O
4. To replace the 3 AMP Buss Fuse: Failure of the Welder to operate may be
caused by a blown 3 AMP Fuse (7) as indicated by its melted wire strand within
the Fuse. To replace the Fuse, unscrew and remove the Fuse Cap. Remove the
old Fuse, and install a new 3 AMP Fuse. Then, replace the Fuse Cap.
5. When storing, make sure to store the Welder in a safe, clean, dry location out of
reach of children and unauthorized users.
6. CAUTION! All maintenance, service, and repairs not listed in this manual
are only to be attempted by a qualified service technician.