


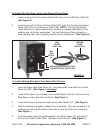
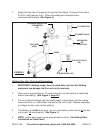

SKU 91146 For technical questions, please call 1-800-444-3353. PAGE 19
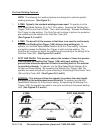
The Four Welding Features:
NOTE: The following four welding features are designed to optimize specific
welding processes. (See Figure K.)
1. 2-TIME: Typically, the standard welding process used. To operate, turn the
Wire Speed Mode Selector (6) to its 2-Time setting. Squeeze the Welding Gun
Trigger (18A) to start the Pre-Gas. Then, weld accordingly. Release the Welding
Gun Trigger to stop welding. The Post-Gas will continue to deliver the protective
gas according to the setting of the Post-Gas Timer (5D).
(See Figures D, F, and K.)
2.
4-TIME: The benefit of this process is that there is no need to continuously
squeeze the Welding Gun Trigger (18A) during a long welding job. To
operate, turn the Wire Speed Mode Selector (6) to its 4-Time setting. Squeeze
and quickly release the Welding Gun Trigger to start and stop welding. The
Post-Gas will continue to deliver the protective gas according to the setting of the
Post-Gas Timer (5D). (See Figures D, F, and K.)
3. SPOT AND PAUSE: This process reduces the number of times the operator
must squeeze the Welding Gun Trigger (18A) while spot welding. This
process also allows the operator to lower the welding heat for thin material
to avoid burn-through. To operate, turn the Wire Speed Mode Selector (6) to
its Spot and Pause setting. By squeezing the Welding Gun Trigger (18A), the
operator can weld and pause in cycle according to the settings of the Pause Timer
(5A) and Spot Timer (5B). (See Figures D, F, and K.)
4. INTERVAL: This process allows the operator to produce the same length
and quality of the welding bead more efficiently. To operate, turn the Wire
Speed Mode Selector (6) to its Interval setting. By squeezing the Welding Gun
Trigger (18A), the operator can weld in one cycle according to the preset welding
time. (See Figures D, F, and K.)
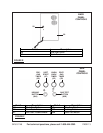
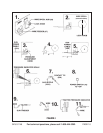
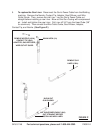
FIGURE K
WIRE SPEED MODE SELECTOR
(6)
INTERVAL
2-TIME
4-TIME SPOT AND PAUSE