


SKU 91146 For technical questions, please call 1-800-444-3353. PAGE 15
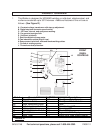
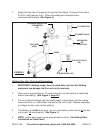
To Attach The Gun Power Cable And Ground Clamp Cable:
1. Insert the plug of the Gun Power Cable (40A) firmly into the MIG Gun Outlet (2).
(See Figure H.)
2. Insert the plug of the Ground Clamp Cable (201) firmly into the High Inductance
Outlet (3A) or the Low Inductance Outlet (3B). NOTE: The High Inductance
Outlet allows for a higher welding heat, resulting in a deeper penetration of the
welding wire into thicker workpieces. The Low Inductance Outlet allows for a
lower welding heat, and is typically used for thinner workpieces. (See Figure H.)
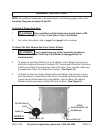
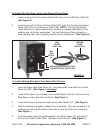
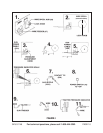
To Install Welding Wire Spool And Adjust Wire Tension:
1. Open the Upper Right Side Panel (21), and remove the Lock Knob on the Wire
Spool Hub (33). (See Figure I, next page.)
2. Insert a Wire Spool (not included) onto the Wire Spool Hub (33), and secure the
Wire Spool in place with the Lock Knob. (See Figure I.)
3. Lower the Pressure Adjustment Knob on the Wire Feeder (37). (See Figure I.)
4. Hold the welding wire tightly to keep it from unraveling. Then pull out about 6” of
welding wire from the Wire Spool, and make a clean cut at the end of the wire.
(See Figure I.)
5. Push the welding wire through the guides in the Wire Feeder (37) and about 4”
into the Gun Power Cable (40A). Continue to hold the wire. (See Figure I.)
FIGURE H
GROUND
CLAMP
CABLE (201A)
GUN
POWER
CABLE (40A)
HIGH INDUCTANCE OUTLET (3A)
LOW INDUCTANCE OUTLET (3B)
MIG
GUN
OUTLET
(2)