


17
English
Scale
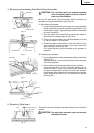
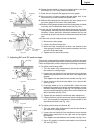
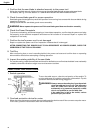
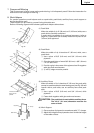
4. Adjustment of pointer
The pointer is equipped to indicate the distance the rip fence is positioned away from the saw blade.
The pointer should indicate the accurate distance from the saw blade.
Check and adjust the pointer by the following procedures.
NOTE: The pointer will need to be readjusted whenever a different thickness saw blade is installed.
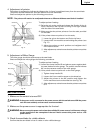
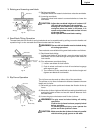
To adjust pointer 0 setting.
(1) Raise the grip to the upside and release the fixation of the rip
fence. And move the rip fence to bring it into tight contact
with the side of the saw blade.
(2) Make sure that the pointer points to 0 on the scale provided
on the table.
(3) If the pointer does not point to 0 on the scale,
q Lower the grip to the bottom and fix the rip fence.
w Loosen the 5 mm machine screw holding the pointer (see
Fig. 17).
e Adjust the pointer to the 0 position and retighten the 5
mm machine screw.
r After adjustment, recheck to see that the pointer now points
to 0.
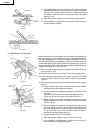
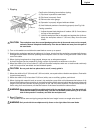
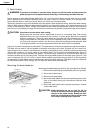
5. Adjustment of Miter Gauge
The miter gauge should be squareness to the saw blade.
Check and adjust the miter gauge the following procedures.
To adjust pointer 0 setting.
(1) Loosen the clamp handle (B) and place a square against both
the saw blade and miter gauge. The pointer should indicate
90° on the protracter scale on the miter gauge.
(2) If the pointer does not point to 0 on the miter gauge,
q Tighten clamp handle (B).
w Loosen the 5 mm machine screw on the sheet bar.
e Adjust the pointer to the 90° position and tighten the
5 mm machine screw on the sheet bar (see Fig. 18).
r After adjustment, recheck to see that the pointer now points
to 0.
BEFORE USING
1. Make sure the switch is turned OFF.
WARNING:If the power cord is connected to the power source with the switch turned ON the power
tool will start suddenly and can cause a serious accident.
2. Make sure the power source is appropriate for the tool.
WARNING:Never connect the power tool unless the available AC power source is of the same voltage
as that specified on the nameplate of the tool. Never connect this power tool to a DC
power source.
3. Check the saw blade for visible defects.
Confirm that the saw blade is free of cracks or other visible damage.
Fig. 17
Pointer
Saw Blade
Rip Fence
Grip
5 mm
Machine Screw
Fig. 18
Sheet Bar
Square
Saw Blade
5 mm Machine Screw
Pointer
Protractor
Scale
Clamp
Handle (B)
Miter Gauge