


21
English
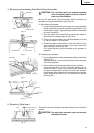
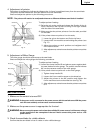
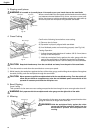
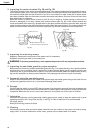
Workpiece
1. Ripping
Confirm the following items before ripping.
(1) Rip fence is parallel to saw blade.
(2) Rip fence is securely fixed.
(3) Remove the miter gauge.
(4) Spreader is properly aligned with saw blade.
(5) Anti-kickback pawls are functioning properly (see Fig. 9-d).
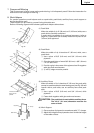
Cutting operation
q Adjust the saw blade height so it is about 1/8" (3.2 mm) above
the top of the workpiece.
w Hold the workpiece flat on the table and against the rip fence.
Keep the workpiece about 1" (25 mm) away from the saw
blade.
CAUTION: The workpiece must have a straightedge against the rip fence and must not be warped,
twisted or bowed. Keep both hands away from the saw blade and away from the path of
the saw blade.
e Turn on the switch on and allow the saw blade to come up to speed.
r Keeping the workpiece against the table and rip fence, slowly feed the workpiece rearward all the way
through the saw blade. Continue pushing the workpiece until it is clear of the guard and it falls off the
rear of the table.
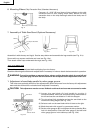
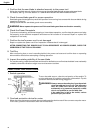
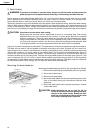
t When ripping long boards or large panels, always use an adequate support.
A simple support can be prepared by fixing a piece of plywood to a sawhorse or the like.
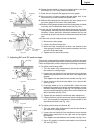
y When the width of rip is more than 6" (152 mm) feed the workpiece with one or both hands continusly
until it is beyond the saw blade and anti-kickback pawls.
CAUTION: Do not push the free piece that is cut off, merely guide it.
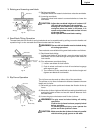
u When the width of rip 2" (50 mm) to 6" (152 mm) wide, use a push stick to feed the workpiece. (Push stick
is optional accessory)
i When the width of rip is less than 2" (50 mm) wide, use an auxiliary guide a push block.
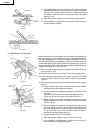
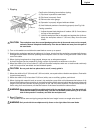
o When ripping thin material (such as veneer), the workpiece may slide or bind between the bottom of rip
fence and the table surface resulting in impossible ripping. Make a board which has the same height and
length of the rip fence surface by using a piece of 3/4" (19 mm) thick plywood. Fix the board to the rip
fence using four wood screws, so that the bottom of the board touches the table surface.
WARNING:Never operate to pull the workpiece back with the saw blade turning. Turn the switch off,
allow the saw blade to complete stop, raise the anti-kickback pawls (see Fig. 9-d) on each
side of the spreader if necessary and slide the workpiece out.
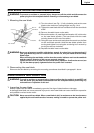
2. Bevel Ripping
This operation is the same as ripping except that the bevel angle is set to an angle other than 0°.
WARNING:Only work with the workpiece and rip fence on the right side of the saw blade.
Fig. 25
Rip Fence