


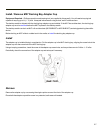
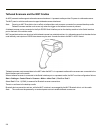


Install / Remove MX7 Docking Bay Adapter Cup
Equipment Required -- Phillips screwdriver and torquing tool (not supplied by Honeywell). You will need a torquing tool
capable of torquing up to 6 (+/- .5) in/lb. Honeywell recommends using a clean, well-lit stable surface.
The desktop cradle is shipped with the docking bay adapter cup pre-installed. If the MX7 has a rubber boot, the docking bay
adapter cup must be removed before the MX7 is placed in the desktop cradle.
The desktop cradle can dock an MX7 with a rubber boot (MX7490BOOT or MX7491BOOT) enclosing/protecting the mobile
device.
Before docking an MX7 without a rubber boot in the cradle, re-install the docking bay adapter cup.
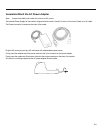
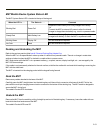
Install
The adapter cup is installed facing in one direction. Put the adapter cup in the MX7 docking bay, aligning the screw hole in the
adapter cup with the screw hole in the MX7 docking bay.
Using a torquing screwdriver, insert the screw in the adapter cup screw hole, and torque the screw to 6 in/lbs +/- .5 in/lbs.
Periodically check the connection of the adapter cup and re-torque if necessary.
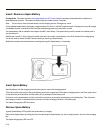
Remove
Remove the adapter cup by unscrewing the single captive screw at the front of the adapter cup.
Place both the adapter cup and the screw in a protected, safe area until needed.
2-7