


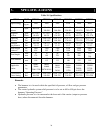
22
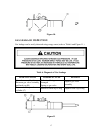
5. Replacing the shank bushing
Note: Replacement of the front cap bushing is required when replacing the shank
bushing, as the front cap bushing must be removed to replace the shank bushing.
a. Measure the shank and front cap bushing; refer to Table 8 page 23 and Table 9
page 24.
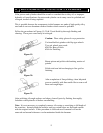
b. Remove bushing spring pin and bushing set pin for shank bushing on the front cap
using a punch and hammer.
c. Press out shank bushing from the cylinder side together with front cap bushing
using a round bar. If the shank bushing is too tight, cutting it with a torch may be
required.
d. Any scratches on the front cap during the cutting operation must be smoothed out
using a hand grinder.
e. Install a new shank bushing after greasing. As bushings are a press, or
interference fit, heating of the front cap or cooling of the bushing will ease
installation of the bushing.
f. Install the bushing set pin and the bushing spring pin.
6. Refinishing surface scratches (see Section 6. Page 27)
a. Cylinder and Cylinder Sleeve
Scratches on the inside surface of the cylinder should be smoothed using a flap wheel
with 240 grit and finish with 360 grit.
b. Piston
Grind off any scratches on the outside surface using a flap wheel with 240 grit and
finish with 360 grit. When polishing the piston or the cylinder bore, it is not necessary
to completely remove scratches (only the sharp edges) as this may remove excess
material. (See Figures 19, 20 and 21 on page 27.)
c. Main Valve and Sleeves
Main valve and sleeves cannot be polished. Replace if these parts do not slide freely
by finger pressure.