


Page 22
Calibration Procedure
Recalibrate your meter:
It is recommended that the multimeter be calibrated once each year.
1. Perform calibration at an ambient temperature of 23°C±2°C and a relative humidity of <70%
Disconnect the test leads and turn the meter off. Remove the test leads from the front terminals.
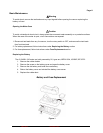
2. Position the meter face down. Remove the battery cover screw and the 2 bottom case cover screws.
3. Lift the end of the bottom case cover until it gently unsnaps from the case top at the end nearest the
LCD.
(A) DC V Calibration (Adjust VR1)
1. Set the rotary switch to position “
” for the DC Volts function.
2. Set the output of DC calibrator for 300.0mV and connect to
and COM input terminals on
meter.
3. Using a small flat-tipped screwdriver, adjust VR1 until the display reads 299.5 to 300.5mV
4. Disconnect the DC calibrator from the meter.
(B) AC V Calibration (Adjust VR2)
Model 61-340:
1. Set the rotary switch to position. “
” for the AC Volts function.
2. Set the output of the calibrator for 3.000V at 60Hz and connect to
and COM input
terminals on meter.
3. Using a small flat-tipped screwdriver, adjust VR2 until the display reads 2.995 to 3.005Volts
4. Disconnect the AC calibrator from the meter.
Model 61-342:
1. Set the rotary switch to position. “
” and press SELECT button to select AC A function,
then press RANGE button to select 10A range .
2. Using a small flat-tipped screwdriver, adjust VR4 until the display reads 0 to 3 digits.
3. Press RANGE button to select 4A range and adjust VR5 until the display reads same as the
digits at AC 10A range ( 0 to 3 digits)
4. Set the rotary switch to position. “
” for the AC Volts Function.
5. Set the output of the calibrator for 3.000V at 60Hz. and connect to
and COM input
terminals on meter.
Form Number 2 TM61340-2 Rev November 2007