


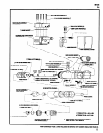

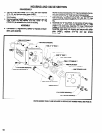
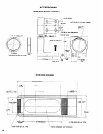

ACCESSORIES
HYDRAULIC CHECK
TRIP BRACKET
44910 MOUNTING BRACKET
(3 POSITION ADJUSTMENT)
NOTE: Hydraulic check assembly (44969-1) is furnished with
models 8670( )-1 and 44969-2 is furnished with models 8670-(
)-3.
HYDRAULIC CHECK: The hydraulic check assembly is a
hermetically sealed unit with a frictionless diaphragm. The hy-
draulic fluid need not be replenished.
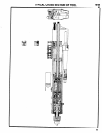
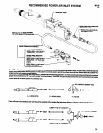
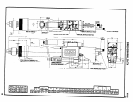
MOUNTING INSTRUCTIONS
Assemble mounting bracket (44910) with hydraulic check
(38922-), to the valve housing with three screws (Y99-45) and
washers (30997).
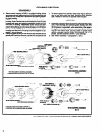
SET-UP PROCEDURES
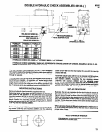
TO CONTROL RATE OF FEED:
1.
2.
Measure distance from drill point to work piece (distance “Y”).
Distance “X” between the hydraulic check plungerand the trip
bracket must be less than distance “Y” to prevent damage to
the drill point when it approaches the work piece. This can be
adjusted by selecting the most suitable mounting of the
3.
4.
5.
,
39997 WASHER (3)
’ Y99-45 CAP SCREW (3)
3-position mounting feature when attaching mounting brack-
et to tool housing and/or positioning of the adjustable trip
bracket. Re-tighten screws before operating unit.
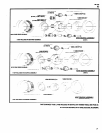
The hydraulic feed rate adjustment is located at the name-
plate end of the hydraulic check. Rotate extended spindle until
the slot on spindle is located midway between the highest and
the lowest settings.
Start tool and the drill will advance at a rapid rate, until the trip
bracket contacts the plunger of the hydraulic check.
Slowly rotate the hydraulic feed rate counterclockwise toward
the zero (0) on the nameplate until the drill advances at the de-
sired rate.
Set-up procedure for the tool will be the same as explained in
“Set-Up Procedure” on page 3.
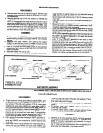
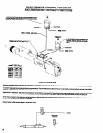
TO CONTROL BREAKTHROUGH:
1. When controlled breakthrough is required, the hydraulic
check must be set up so the distance between the plungerand
the trip bracket (distance “X”) is less than the distance from the
2.
drill point to the opposite side of the work piece (distance “W).
Set-up procedure for the tool will be the same-as explained in
“Set-Up Procedure” on page 3.
12