


10
Assembling the Sander
Tools Required for Assembly (not provided):
Ratchet wrench with extension
7/16”, 9/16” and 1/2” sockets
9/16” open-end wrench
Flat blade screwdriver
Installing Drum Head
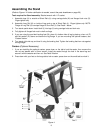
1. Lift the drum head assembly out of the box,
and temporarily rest it crosswise on top of
the stand. (If your stand has casters, make
sure they are locked.)
The drum head is heavy; use
an assistant to help lift if needed.
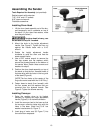
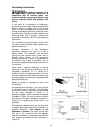
2. Mount the knob to the height adjustment
handle. See Figure 5. Tighten the hex nut
against the handle base with a 9/16”
wrench.
3. Rotate the height adjustment handle
clockwise to raise the drum and free the
wood support blocks.
4. Use a 9/16” socket wrench to remove the
hex cap screws and flat washers which
secure the plywood boards to the bottom of
the sander base. Retain these screws and
washers for step 6.
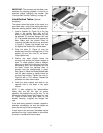
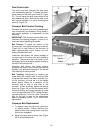
5. Position the drum head assembly on top of
the stand so that the four threaded holes of
the base align with the holes in the long rails
of the stand (Figure 6).
[NOTE:The four holes at the center of the
long rails are not used with the 16-32 Plus.]
6. Fasten base to stand (from beneath) with
the four screws and flat washers that you
removed from the plywood boards. See
Figure 6. Tighten the screws securely.
Installing Conveyor
1. Raise the sanding drum to its highest
elevation by rotating the height adjustment
handle (Figure 5) in a clockwise direction.
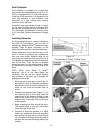
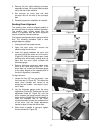
2. Install the conveyor bed to the base so that
the conveyor mounting holes align with the
holes in the base. Install four 5/16” hex
washer head screws (A, Figure 7).
3. Insert plug of motor cord (B, Figure 7) into
the control box receptacle.
Figure 5
Figure 6
Figure 7