


17
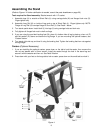
3. Remove the four bolts attaching conveyor
assembly to base. Lift up and slide conveyor
out to the side of the machine.
4. Set conveyor on motor side and slide
conveyor belt off the end of the conveyor
bed.
5. Reverse process for installation of new belt.
Sanding Drum Alignment
The sanding drum must be aligned parallel to
the conveyor bed for proper machine operation.
The sanding drum comes preset from the
factory. If a problem with the drum alignment
occurs, follow the instructions below.
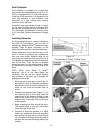
First inspect the alignment with a gauge of some
kind. The following procedure uses a steel
straight edge as a gauge.
1. Unplug sander from power source.
2. Open the dust cover and remove the
abrasive strip from the drum.
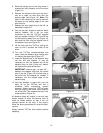
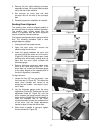
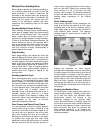
3. Insert the gauge between the drum and
conveyor bed at the outer end of the drum
(Figure 23). With the dust cover open, lower
sanding drum while slowly rotating drum by
hand until the drum lightly contacts the
thickness gauge.
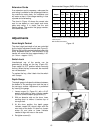
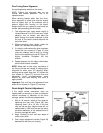
4. Remove thickness gauge and place under
drum at the other end (Figure 24). If the
drum does not contact the thickness gauge
to the same degree as the opposite end of
the drum, alignment is necessary.
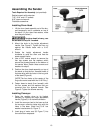
To align the drum:
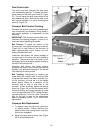
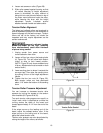
1. Loosen the four 3/8” hex cap screws – two
front, two rear (A, Figure 25). This allows the
entire drum carriage and shroud to be
pivoted on two screws – one screw in front,
one in back.
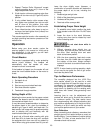
2. Lay the thickness gauge under the drum
lengthwise (Figure 26). Rotate the fine tune
adjustment knob (B, Figure 25) until the
drum contacts the gauge equally along its
entire surface. Rotate the knob clockwise to
raise the outboard end of the drum,
counterclockwise to lower the outboard end
of the drum. Use the height adjustment
handle to raise or lower the entire drum.
3. When drum is parallel to conveyor, tighten
the four screws (A, Figure 25).
Figure 23
Figure 24
Figure 25
Figure 26