


13
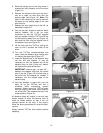
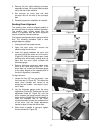
5. Mark the trailing end of the strip where it
crosses the right (inboard) end of the drum
(Figure 13).
6. Remove the abrasive strip from the drum,
and cut a taper as was done with the
starting edge (see Figure 10). Note: The
taper on the remaining roll can be used as
the taper for the starting edge of the next
strip to be cut.
7. Rewrap the drum beginning at the left, as
described in steps 2-4 .
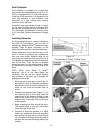
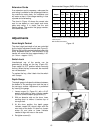
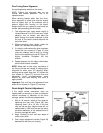
8. You can use your fingers to work the infeed
take-up fastener, but it will be more
convenient to use the TUFTool supplied
with your sander. Hold the TUFTool with the
red end pointing away from you (Figure 14)
and insert its hook into the outside hole of
the fastener lever (see Figure 16).
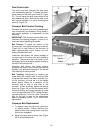
9. Lift the lever with the TUFTool, pulling the
lever up until it touches the inside of the
drum.
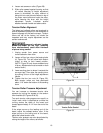
10. Turn the TUFTool counterclockwise and
lower it onto the abrasive strip, making sure
it is holding the paper tight (Figure 15).
11. Insert the tapered end of the abrasive strip
into the slot and fastener. It may be
necessary to trim the tapered end of the
abrasive strip so that it does not “bottom
out” against the inside of the drum.
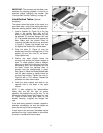
IMPORTANT: Leave a gap – at least 1/8” –
between the tapered strip and the closed
end of the slot (Figure 15) to allow strip to
be pulled into the fastener as needed. If
necessary, trim the outside edge of the
abrasive strip.
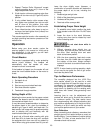
12. Hold the abrasive in place with your left
hand, lift up the TUFTool and turn it
clockwise while maintaining upward
pressure. Slowly move the TUFTool away
from you slightly, then down, while easing it
out of the hole. This releases the lever in its
proper position (Figure 16).
All abrasive strips will stretch in use and may
stretch enough to allow the take-up lever to
reach its lowest position so that it can not
maintain tension on the strip. If this occurs,
follow the above procedures to re-set the take-
up lever.
Always remove TUFTool from machine before
operating.
Figure 13
Figure 14
Figure 15
Figure 16