


25
Abrasives
The abrasive material you choose will have a
substantial effect on the performance of your
sander. Variations in paper type, weight, coating
and durability all contribute to achieving your
desired finish.
JET Abrasives are available in Ready-To-
Wrap
TM
pre-cut lengths or in the convenient
Ready-To-Cut pre-marked box. Your JET dealer
can recommend the best choice for your
application.
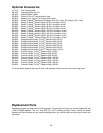
Selecting Drum Abrasives
It is important to select the proper grit of
abrasives for the type of sanding being
performed to achieve maximum sanding results.
As with any sanding operation, first begin
sanding with a coarser grit, depending upon the
roughness of the stock or the amount of stock to
be removed. Then progressively work toward
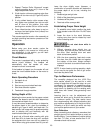
finer grits. The chart (Figure 33) shows the
general uses for the various grits. JET offers
abrasives in the ten different grits shown –
consult the stock numbers on page 26 to order.
The amount of stock to be removed is a major
consideration when choosing the grit grade to
start with. Grits 24, 36, 50 and 60 are primarily
designed for stock removal. Grits 24 and 36 will
remove the most material in one pass, whether
you are doing abrasive planing, cleaning up
glued panels, or flattening stock. Grits from 100
through 220 are primarily finishing grits designed
to remove the scratch pattern from the previous
grit used. For best results, never skip more than
one grit grade when progressing through a
sanding sequence.
For fine work, such as furniture, try not to skip
any grit grades during the sanding process. In
general, premium quality abrasives will produce
a better finish with a less noticeable scratch
pattern.
NOTE: Grits that are too fine can sometimes
burnish the wood and leave a glossy surface
which will not accept stains evenly. This will vary
by type of wood. Oak, for example, is
susceptible to burnishing because of its open
pores.
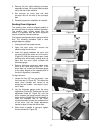
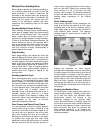
Cleaning Abrasive Strips
Regularly clean the abrasive strips on the drums
with commercially available cleaning sticks,
following the manufacturer’s directions. Cleaning
sticks are available from your JET dealer. When
cleaning, also brush the stick crumbs from the
drum while it is still rotating.
Always wear eye protection
while performing sandpaper cleaning, and
take all precautions to avoid any contact of
hands or clothing with uncovered rotating
drums.
Cloth-backed abrasives can be cleaned by
soaking in paint thinner or mineral spirits for 20
minutes to 1 hour, then using a brush to remove
any build-up or burns. Dry the abrasive strips
completely before using.
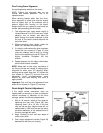
Increasing Abrasive Life
Abrasive life can be increased not only by
cleaning, but by removing the abrasive strip from
the drum and reversing it. To do this, remove the
strip and use what was the trailing end as the
starting end on the left (outboard) side of the
drum. Reversing the strip will provide a fresh set
of cutting edges on the abrasive.
Figure 33
A
brasive Selection Guide
Grit Common Application
24........ Abrasive planing, surfacing rough-sawn boards, maximum stock removal, glue removal.
36........ Abrasive planing, surfacing rough-sawn boards, maximum stock removal, glue removal.
50........ Surfacing and dimensioning boards, trueing warped boards
60........ Surfacing and dimensioning boards, trueing warped boards.
80........ Light dimensioning, removal of planer ripples.
100......Light surfacing, removal of planer ripples.
120......Light surfacing, minimal stock removal.
150......Finish sanding, minimal stock removal.
180......Finish sanding only, not for stock removal.
220 .....Finish sanding only, not for stock removal.