


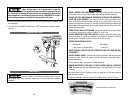
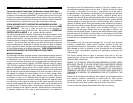
ADJUSTING THE TABLE HEIGHT
Turn the drill press ON/OFF switch to the OFF position
and disconnect the AC power to prevent drill press from accidentally turning
on.
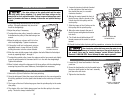
1. Loosen the table lock handle.
2. Turn the table crank handle count-
er-clockwise to lower the work-
table and clockwise to raise it.
3. Adjust the worktable to the
desired height.
4. Securely lock the table lock han-
dle.
5. Apply the AC power and turn the
ON/OFF switch to the “ON” posi-
tion. Operate the drill press to
ensure the worktable is properly
adjusted.
ADJUSTING THE TABLE TILT
Turn the drill press ON/OFF switch to the OFF position and
disconnect the AC power to prevent drill press from accidentally turning on.
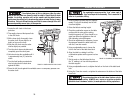
1. Using a 3mm hex wrench, loosen the setscrew under the table bevel lock.
2. Using an adjustable wrench or a 24mm socket, loosen the table bevel lock.
3. Rotate the table to the desired tilt. Use the pointer and the bevel scale on the
table mount to set the table tilt.
The bevel scale settings and pointer on the table mount
are only an approximate measurement. Use a magnetic protractor (or simi-
lar precision device available from a retail tool supplier) on the tabletop to
set the desired tilt angle.
24
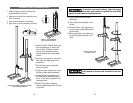
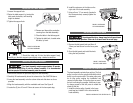
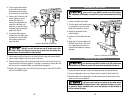
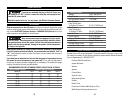
4. Turn the adjustment sleeve
on the drill chuck counter-
clockwise to open the jaws
and clockwise to close them.
5. Insert a drill bit into the drill
chuck. Tighten the jaws
around the drill bit by
turning the adjustment key.
Insert the chuck key into
each hole on the drill chuck
to tighten each jaw securely
against the drill bit.
6. Loosen the table support
lock and turn the table crank
clockwise to raise the table
and counter-clockwise to
lower the table.
DO NOT use drill bits that are over 6" inches long in this
drill press. Longer drill bits are more prone to break than the shorter bits
when pressure is exerted with the feed handles.
7. Set the table height so that the tip of the drill bit will reach the desired depth.
8. Lock the table support lock by turning it clockwise.
9. Grasp the feed handles and rotate them toward the front of the drill press low-
ering the drill bit onto the workpiece. This step is necessary to ensure the hole
will be where it is intended. Make any adjustments necessary.
10.Plug the drill press power cord into the AC power source. Insert the YELLOW
key into the ON/OFF switch.
23
FIGURE 14. INSERTING THE DRILL BIT
FIGURE 15. ADJUSTING THE TABLE HEIGHT