


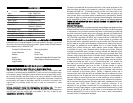
FFUUNNCCTTIIOONNAALL DDEESSCCRRIIPPTTIIOONN
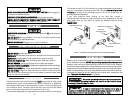
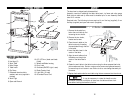
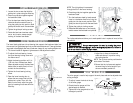
CCOONNTTRROOLLSS AANNDD CCOOMMPPOONNEENNTTSS::
1. Band Saw
2. Hex Keys (2)
3. Work Table
4. Miter Gauge
5. Table Insert
6. Rip Fence
7. Recessed three hex bolts,
washers and nuts (supplied in
the bag)
8. Work Light
9. Open-end Wrench
AASSSSEEMMBBLLYY
The band saw is shipped partly disassembled.
Assembly consists of attaching the table, table insert, rip fence and miter gauge.
Both the work table and rip fence must be installed prior to use. Assembly should
take 10-15 minutes.
Required tools: The following tools are required: 4 mm Hex key (supplied), 3 mm
Hex key (supplied) and open-end wrench (supplied).
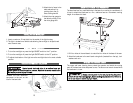
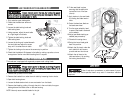
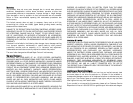
AASSSSEEMMBBLLIINNGG TTHHEE TTAABBLLEE
1. Remove the bracket from
below the work table by first
loosening the two knobs.
2. Remove the two knobs,
bracket and screws.
3. Place the work table on the
table trunnion by threading
the saw blade through the slot
in the table.
4. Insert the table insert in the
center of the table.
5. Align the work table so that
the blade runs though the
center of the table insert’s
slot.
6. Fasten the work table to the table trunnion using the three recessed hex bolts,
plain washers and nuts. Caution: make sure the screws are tightened securely
to ensure they do not loosen in use. Failure to do so can change the saw’s per-
formance.
7. Replace the bracket under the work table using the two screws and two thumb nuts.
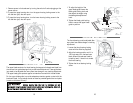
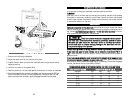
It may be necessary to rotate the handle counter-
clockwise to be able to slide the rip fence over the table and then clock-
wise before locking the handle in position.
1211
10. 62" (1575mm) band saw blade
(fitted)
11. Wheel and Blade housing
12. Door Latch
13. Switches (ON/OFF, Light, Laser)
14. Blade Tension Knob
15. Light Bulb (15 watt)
16. Grounded Power Cord
2
7
11
11
13
10
1
14
3
5
16
4
8
12
12
15
6
9