


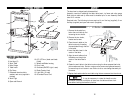


MMOOUUNNTTIINNGG TTHHEE SSAAWW TTOO AA WWOORRKKBBEENNCCHH
The band saw has four predrilled holes in the base for mounting to a workbench. It
is best to attach the band saw to a firm, stable surface at a convenient working
height. A workbench is ideal.
1. Drill four holes in the workbench to match the four holes in the base of the saw.
2. Attach the band saw to the work bench using bolts (inserted from the top), lock
washers and nuts.
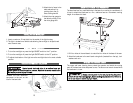
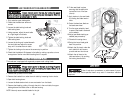
OOPPEENNIINNGG TTHHEE HHOOUUSSIINNGG DDOOOORRSS
The upper and lower housing doors protect the operator and shield the moving
parts of the band saw drive and power source. The doors must remain closed while
the band saw is in use.
AAllwwaayyss rreemmoovvee ppoowweerr ttoo tthhee ssaaww,, bbyy ttuurrnniinngg tthhee ppoowweerr
sswwiittcchh ooffff aanndd tthheen
n uunnpplluuggggiinngg iitt,, bbeeffoorree mmaakkiinngg aannyy aaddjjuussttmmeennttss.. FFaaiilluurree ttoo
ddoo ssoo ccaann rreessuulltt iinn sseevveerree iinnjjuurryy oorr ddeeaatth
h..
14
13
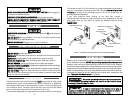
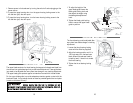
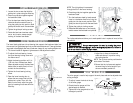
IINNSSTTAALLLLIINNGG TTHHEE WWOORRKKLLIIGGHHTT
1. Insert a maximum 15 watt bulb into the socket of the light housing.
2. The light is located on a flexible tube allowing the worklight to be positioned
onto the work area.
OOPPEERRAATTIINNGG TTHHEE WWOORRKKLLIIGGHHTT
1. To turn the worklight on press the light ON/OFF switch to the “I” position.
2. To turn the worklight off press the light ON/OFF switch to the “O” position.
3. To adjust the direction of the light move the worklight tube to the most suitable
position.
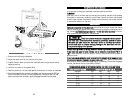
CCOONNNNEECCTTIINNGG TTHHEE DDUUSSTT CCOOLLLLEECCTTOORR
CCoonnttrrooll wwoooodd dduusstt aanndd cchhiippss iinn aa ccoonnffiinneedd aarreeaa aanndd
gguuaarrdd aaggaaiinnsstt aallll ppoossssiibbllee iiggnniittiioonn ssoouurrcceess.. FFaaiilluurree ttoo ddoo ssoo ccaann rreessuulltt iinn ffiirree
aanndd ccaauussee ppeerrssoonnaall iinnjjuurryy oorr ddeeaatthh..
Connect the dust extraction
equipment to the port on the
back of the band saw.
8. Attach the rip fence to the
table and secure it by
pushing down the rip
fence locking handle.
9. Attach the miter gauge to
the table by sliding it into
the miter gauge slot.