


7
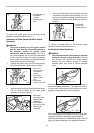
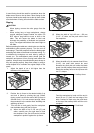
To use the sub table (back), loosen the screws on the left
and right hand sides under the table and pull it out
backwards to the desired length. At the desired length,
tighten the screw securely.
NOTE:
• When using the sub table (back ) during use of the
rip fence, pull out the sub table (back) more than
50 mm so that it does not hit against the top end of
the rip fence.
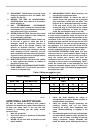
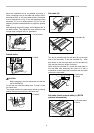
1
1
2
006151
Sub table (back) can be installed at the back of the table
to assure wider space. Sub table (L) can be installed on
the left side of the table.
ASSEMBLY
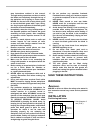
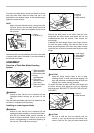
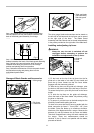
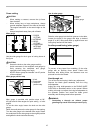
Overview of Table Saw Blade Guarding
System
1
2
4
5
3
008941
WARNING:
• Always be sure that the tool is switched off and
unplugged before carrying out any work on the
tool.
The saw blade and blade guard are not installed on the
tool when it is shipped from the factory.
Installing or removing saw blade
WARNING:
• Always be sure that the tool is switched off and
unplugged before installing or removing the blade.
• Use only the Makita socket wrench provided to
install or remove the blade. Failure to do so may
result in overtightening or insufficient tightening of
the hex bolt. This could cause an injury.
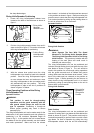
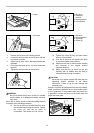
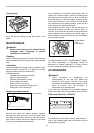
1
2
3
008730
Remove the table insert on the table. Hold the outer
flange with the offset wrench and loosen the hex nut
counterclockwise with the wrench. Then remove the
outer flange.
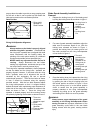
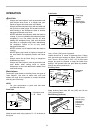
Assemble the inner flange, blade, outer flange and hex
nut onto the arbor, making sure that the teeth of the
blade are pointing down at the front of the table. Always
install the hex nut with its recessed side facing the outer
flange.
12
3
4
006136
CAUTION:
• Keep the flange surface clean of dirt or other
adhering matter; it could cause blade slippage. Be
sure that the blade is installed so that the teeth are
aligned in the cutting (turning) direction.
To secure the blade in place, hold the outer flange with
the offset wrench, then tighten the hex nut clockwise
with the wrench. BE SURE TO TIGHTEN THE HEX NUT
SECURELY.
1
2
008731
CAUTION:
• Be sure to hold the hex nut carefully with the
wrench. If your grip should slip, the wrench may
come off the hex nut, and your hand could strike
1. Wrench
2. Offset wrench
1. Inner flange
2. Outer flange
3. Saw blade
4. Hex nut
1. Wrench
2. Hex nut
3. Offset wrench
1. Table saw blade
guard assembly
2.
Antikickback pawls
3. Riving
knife/spreader
4.
Riving knife/
spreader release
lever location
5. Table saw blade
side
g
uards
1. Screw
2. Sub table (L)