


8
the sharp blade edges.
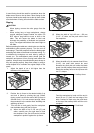
Riving Knife/Spreader Positioning
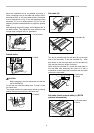
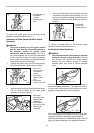
1. Locate the riving knife/spreader release lever
located at the back of the table saw as shown in
figure 1.
1
Fig.1
008748
2. Pull the riving knife/spreader release lever until it
stops as shown in figure 2. This action will release
the riving knife/spreader for positioning.
1
Fig.2
008749
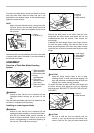
3. With the release lever pulled move the riving
knife/spreader up or down by hand to the desired
position. Once the riving knife/spreader begins
to move release the lever and continue to move
the riving knife/spreader to the next setting and it
will automatically lock into position. The riving
knife/spreader is able to lock into 3 positions as
shown in figures 3-5 below.
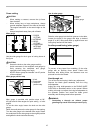
Three Operating Positions of the Riving
Knife/Spreader Unit
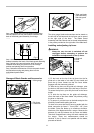
Spreader Position
WARNING:
• This position is used for through-cutting
operations and the guard assembly with the
side guards should always be used for this
type of operation. Conducting a through-cut
without proper guarding may result in serous
personal injury.
The riving knife/spreader unit can be made ready for the
attachment of the guard assembly and side guards by
positioning it at the maximum adjustable height as
shown in Fig 3. In this position the unit is raised above
the blade so that the guard assembly can be installed
and made operational. Make sure that the release
lever located at the back of the table saw has returned
to the position as shown in figure 1. Before mounting the
guard be sure to check that the riving knife/spreader unit
is in a locked position by pulling up and pushing down on
the unit to ensure there is no movement.
Spreader Position
1
Fig.3
008750
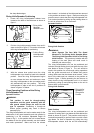
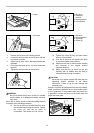
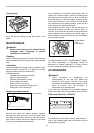
Riving Knife Position
WARNING:
• Never Operate The Saw With The Guard
Mounted To The Riving Knife/ Spreader When
The Riving Knife/ Spreader Unit Is In The Riving
Knife Position. The guard may interfere with the
feeding of the work piece and could result in
kickback and serious injury.
The riving knife/spreader unit can be positioned and
locked at a height setting that is just below the top of the
saw blade as shown in figure 4. The unit would be
used in this position for non-through cutting operations
with the guard removed such as rabbets and groove
cutting. Make sure that the release lever located at the
back of the table saw has returned to the position as
shown in figure 1. Before operating the tool be sure to
check that the riving knife/spreader unit is in a locked
position by pulling up and pushing down on the unit to
ensure there is no movement
Riving Knife Position
1
Fig.4
008751
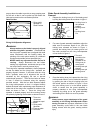
Dado Position
The riving knife/spreader unit can be positioned and
locked at a setting that is just below the table behind the
blade as shown in figure 5. This position would only be
used while attempting to perform dado cuts with a dado
type blade. For ease of operation by pulling the riving
knife/spreader release lever the unit will automatically
1. Riving Knife/
Spreader in
Riving Knife
Position
1. Riving Knife/
Spreader in
Spreader
Position
1. Pull the Riving
Knife/Spreader
release Lever
1. Riving Knife/
Spreader
Release Lever