


OM-217 Page 26
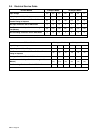
5-6. Troubleshooting
Trouble Remedy
No cutting output; Power light off;
Trouble lights off; Ready light off; fan mo-
tor FM does not run.
Place Power switch in On position.
Place line disconnect device in On position (see Section 3-10).
Check line fuse(s) and replace if needed or reset circuit breakers (see Section 3-10).
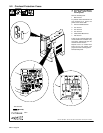
Check main fuse F1 and replace if needed (see Section 5-2).
Have Factory Authorized Service Agent check contactor W.
No cutting output; Power light on; Ready
light on; Trouble lights off; fan motor FM
running.
Be sure work clamp is connected.
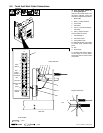
Check for proper torch switch lead connections (see Sections 3-8 and 5-5).
Check for for proper position of jumper link on terminal strip 1T (see Section 3-8).
Have Factory Authorized Service Agent check contactor W, control relay CR3, and firing board PC2.
No cutting output; Power light on; Ready
light off; Trouble lights off; fan motor FM
running.
Check fuses on timer/control board PC1 and isolator/filter board PC5 (see Section 5-2).
Have Factory Authorized Service Agent check timer/control board PC1.
No control of output. Check for for proper position of jumper link on terminal strip 1T (see Sections 3-8).
Have Factory Authorized Service Agent check Output control R1, timer/control board PC1, hall device
HD1, and firing board PC2.
No gas/air flow; Power light on; Ready
light on; Trouble lights off; fan motor FM
running.
Check fuses on timer/control board PC1 and isolator/filter board PC5 (see Section 5-2).
Check for proper torch connections (see torch Owner’s Manual).
No gas/air flow; Power light on; Ready
light off; Trouble lights off; fan motor FM
running.
Check fuses on timer/control board PC1 and isolator/filter board PC5 (see Section 5-2).
No pilot arc or high frequency; difficulty
in establishing an arc.
Check fuses on timer/control board PC1 and isolator/filter board PC5 (see Section 5-2).
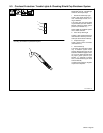
Check and adjust spark gap, if needed (see Section 5-4).
Check for damaged torch or torch cable (see torch Owner’s Manual).
Have Factory Authorized Service Agent check control relay CR1, timer/control board PC1, and firing
board PC2.
Erratic pilot arc, difficulty in establishing
an arc, and lowered cutting capacity.
Check for excessive moisture and/or contaminants in gas/air supply.
Check for dirty air filter/regulator and clean, if needed (see manufacturer’s instructions).
Gas/Air Or Shield Cup Trouble light
on; Ready light off.
Place Set/Run switch in Run position.
Check for sufficient gas/air supply pressure and correct gas/air pressure adjustment (see Section 4-1).
Check torch shield cup and o-ring (see torch Owner’s Manual).
Check for dirty air filter/regulator and clean, if needed (see manufacturer’s instructions).
Have Factory Authorized Service Agent check timer/control board PC1.
Torch-To-Tip Short Trouble light on;
Ready light off.
Check to make sure torch electrode is not touching tip inside the torch (see torch Owner’s Manual).
Check to make sure torch lead connections are tight on terminal strip 1T (see Sections 3-8 and 5-5).