


12 13
Fig. 4
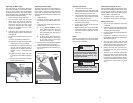
E
D
C
B
A
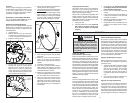
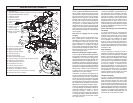
Fig. 5
Detent Angles
Unlock
Lock
Bevel
Adjustment
Lever
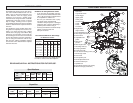
Adjusting the Bevel Angle
The bevel angle can be set using detents for
commonly cut angles, as well as adjusted
to any angle in between by using the bevel
angle scale. The bevel mechanism also has
several degrees of overtravel on both the left
and right.
1. Unplug the tool.
2. To adjust the bevel angle, place one
hand on the front handle for better con-
trol.
3. Using the other hand, lift the bevel ad-
justment lever:
A. To use pre-set detents, lift the
bevel adjustment lever half-way
up (until it "clicks") to move the
saw head left or right, with stops at
pre-set detents.
B. To freely move the head, lift the
bevel adjustment lever all the way
up to freely move the saw head
across the bevel range.
4. Pull or push the saw head to the desired
angle using the bevel angle scale.
5. Lock the bevel angle by pressing down
the bevel adjustment lever before mak-
ing a cut.
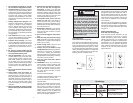
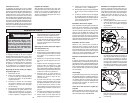
Adjusting the Miter Angle
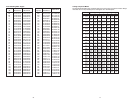
The miter angle can be set using detents for
commonly cut angles, as well as fi nely adjust-
ed to any angle. Use the miter angle pointer
to adjust the turntable to any whole degree
across the miter range. The digital miter angle
readout shows the selected angle.
1. Loosen the miter angle lock knob.
2. To set the miter angle, pull up on the
detent lever and rotate the turntable
to the detent angle closest to the de-
sired angle. The saw cuts miter angles
from 55° on the left to 60° on the right.
Detents are available at 0°, 15°, 22.5°
32.62°, 45°, and 60°.
3. Tighten the miter angle lock knob to use
the miter angle set at the detent before
making a cut.
4. To make a fi ne adjustment to the miter
angle:
A. Pull up and hold the detent lever .
B. Push the fi ne adjustment ring forward
until it locks to engage override.
C. Rotate the fi ne adjustment ring left
or right until the desired angle is
displayed on the digital miter angle
readout. ¼ turn = 1° change in miter
angle.
D. Tighten the miter angle lock knob
to secure the table before making a
cut.
E. Pull up on the detent lever to release
the fi ne adjustment ring.
WARNING
To reduce the risk of injury, do not
rely on the brake as a safety feature.
Always wait until the blade stops
completely before allowing any-
thing near the blade.
Adjusting the Fences
1. Loosen the fence lock knobs.
2. The left side fence can slide side-to-side
to the desired position to allow for a left
bevel or left compound miter cuts.
3. The right side fence can be removed for
a right bevel or right compound miter
cuts by pulling the fence up.
4. Always position the fences properly for
maximum work support.
5. Tighten the fence lock knobs securely
before making a cut.
NOTE: If either fence has any movement
forward to backward, tighten the fence
set screw, located on the back of each
fence slot.
Lights
Use the on/off switch to turn on the turntable
lights before making a cut. Turn off the lights
when cutting is complete.
WARNING
To reduce the risk of injury, make
sure all adjustments are securely
locked before making a cut.
Starting and Stopping the Tool
Always hold the trigger handle fi rmly because
the starting and stopping action of the motor
may cause the handle to move up or down
slightly. Always secure the turntable by tight-
ening the miter angle lock knob.
1. To start the motor, pull the trigger.
2. To stop the motor, release the trigger.
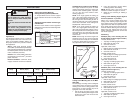
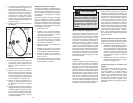
Making a Chop Cut
1. Plug in the tool. Raise the saw head
completely.
2. Select the desired angles following the
steps in "Adjusting the Miter Angle" and
"Adjusting the Bevel Angle".
3. Place the workpiece on the turntable and
line up the cut.
4. Support the workpiece using any of
the methods described in "Support the
Workpiece Properly".
5. Start the motor. Wait a few seconds
for the blade to reach full speed. Then
gently lower the saw head into the work-
piece all the way through the cut (3).
6. Always allow the saw to do the work.
Forcing the tool may stall or overheat
the motor.
7. After the cut is complete, release the
trigger and wait for the blade to stop
completely. Then gently raise the saw
head and remove the workpiece. Always
unplug the tool before retrieving loose
cut-off pieces from inside the guard
area.