


11
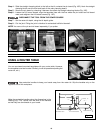
HALF-BLIND DOVETAILS WITH CLAMPING BOARDS
You can mount your half-blind template that comes with the 4210 and 4212 jigs and the 4211 accessory kit to a
board. This method, however, limits your workpiece width capacity to 8".
SETUP
Items needed to setup for the half-blind dovetails:
1. Wood to make the clamping board parts
2. Clamps
3. 2" #10 wood screws (2)
4. 1/4-20 threaded T-nut
5. 1/4-20 x 4" bolt
6. 1/4" washer
NOTE: These instructions can be modified for making half-
blind dovetails with the through dovetail template and for
the miniature dovetail template (See the section “HALF-
BLIND DOVETAILS WITH TAIL BOARDS THICKER THAN
7/8").
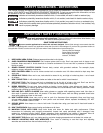
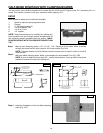
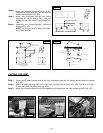
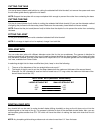
Fig. 14A
MAKE THIS DIMENSION THE
THICKNESS OF THE PIN BOARD
THAT IS TO BE DOVETAILED
MAKE TWO OF THESE BLOCKS
WOOD GRAIN
"1
"1-1/2
"1/2
"3/4
DRILL A " HOLE
THROUGH THE BLOCK
1/4
WOOD GRAIN
3/8" WIDE MORTISE GOES
THROUGH BLOCK. MORTISE
IS CENTERED ON BLOCK.
DRILL PILOT HOLES
FOR #10 WOOD SCREWS
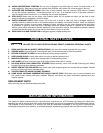
"1-1/2
"3-1/4
"16
"2
"2-1/4
"13-3/4"1-1/8
"1/2
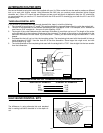
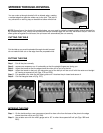
Fig. 15A Fig. 15B
Make a main clamping board 1-1/2" x 3-1/4" x 16". Square all of the sides. Make a mortise
through the board and drill pilot holes for #10 wood screws (Fig. 15A).
NOTE: Threaded inserts and #10 flathead machine screws can be used in place of the #10
wood screws.
Make the offset clamping block. Make a counterbore for the threaded T-nut (Fig. 15B).
NOTE: If your pin board is thinner than 3/4", modify the dimension. You may need to use extra
washers to prevent the bolt from sticking out.
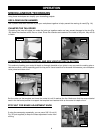
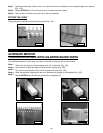
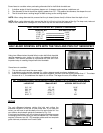
Step 1 -
Step 2 -
Fig. 15C
Insert the threaded nut into the offset clamping
block (Fig. 15C).
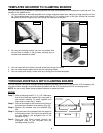
Step 3 -