13
Table Extensions
Loosen the handles (C, Figure 15) and slide the
extensions outward, then re-tighten the handles.
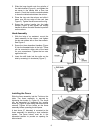
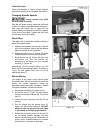
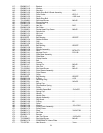
Changing Spindle Speeds
Change speeds only while
the drill press is running.
With the drill press running, rotate the shift knob
(Figure 17) slightly counterclockwise to loosen it,
then push the handle left or right until the
desired speed is displayed on the LED readout
at the front of the head. Tighten the shift knob
clockwise to secure the setting.
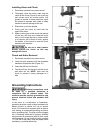
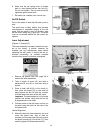
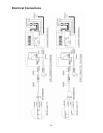
Depth Stop
The depth stop is useful for repetitive drilling of
holes of the same depth.
1. Measure the distance from the tip of the drill
bit to the workpiece. Add to this the desired
depth of the hole in the workpiece.
2. Rotate the bottom nut (A, Figure 18) to this
measurement on the accompanying scale.
3. Bring the top nut (B, Figure 18) flush with
the bottom nut. This will prevent any
movement of the bottom nut as it contacts
the seat (C, Figure 18).
Alternatively, for less precise drilling, you can
lower the bit to the desired depth, as shown in
Figure 18, and tighten both nuts (A and B)
against the seat (C).
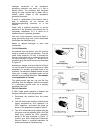
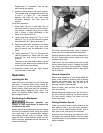
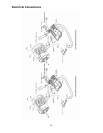
Return Spring
The tension of the return spring (which raises
the spindle after drilling) has been pre-set at the
factory. No further adjustment should be
attempted unless absolutely necessary. Should
it become necessary, proceed as follows:
1. Disconnect machine from power source.
2. Pry off the cap (A, Figure 19) and remove
the hex nut and two washers (B). Pull off the
hub (C).
3. Loosen the two inner hex nuts (D) Do not
remove.
4. Pull out slightly the coil spring cover (E,
Figure 19) while firmly holding it. DO NOT
allow the coil spring cover to turn freely
in your hand, or the spring will unwind.
5. Rotate the coil spring cover until the tab (F)
on the spring retainer engages the next
notch in the coil spring cover. Rotate the coil
spring cover counterclockwise to increase
spring tension, clockwise to decrease.
Figure 17
Figure 18
Figure 19