


14
UNPACKING
This product requires assembly.
NOTE: Every RIDGID® Thickness Planer is tested at the
factory to insure its performance. You may see small amounts
of wood dust and chips on your new planer.
Carefully lift the tool from the carton and place it on a
level work surface.
NOTE: This tool is heavy. To avoid back injury, lift with
your legs, not your back, and get help when needed.
Inspect the tool carefully to make sure no breakage or
damage occurred during shipping.
Do not discard the packing material until you have care-
fully inspected and satisfactorily operated the tool.
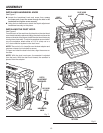
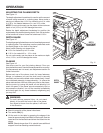
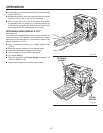
Remove the dust hood from its position on top of the
motor housing then remove the cardboard from the
cutterhead.
NOTE: Install the dust hood before using this product.
Remove the blue plastic covering the planer table prior
to turning on this product.
The tool is factory set for accurate cutting. After
assembling it, check for accuracy. If shipping has influ-
enced the settings, refer to specific procedures explained
in this manual.
If any parts are damaged or missing, please call
1-866-539-1710 for assistance.
WARNING:
If any parts are damaged or missing, do not
operate this tool until the missing parts are
replaced. Failure to heed this warning could result
in serious personal injury.
WARNING:
Do not attempt to modify this tool or create
accessories not recommended for use with this
tool. Any such alteration or modification is misuse
and could result in a hazardous condition leading
to possible serious personal injury.
WARNING:
Do not connect to power supply until assembly
is complete. Failure to comply could result in
accidental starting and possible serious personal
injury.
MOUNTING THE PLANER TO WORKBENCH
If your planer is to be used in a permanent location, it is
recommended you secure it to a workbench or other stable
surface. When mounting the planer to a workbench, holes
should be drilled through the supporting surface of the
workbench.
Mark holes on workbench where planer is to be mounted
using holes in planer base as a template for hole pattern.
Drill four holes through workbench.
Place planer on workbench aligning holes in the planer
base with holes drilled in the workbench.
Insert four bolts (not included) and tighten securely with
lock washers and hex nuts (not included).
NOTE: All bolts should be inserted from the top. Install
the lock washers and hex nuts from the underside of the
workbench.
Supporting surface where planer is mounted should be
examined carefully after mounting to insure that no move-
ment during use can result. If any tipping or walking is noted,
secure workbench or support surface before beginning
planing operation.
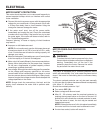
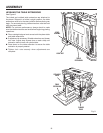
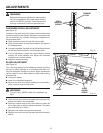
CLAMPING PLANER TO WORKBENCH
See Figure 6.
If the planer is to be used as a portable tool, it is recommended
you fasten it permanently to a mounting board that can eas-
ily be clamped to a workbench or other stable surface. The
mounting board should be of sufficient size to avoid tipping
while planer is in use. Any good grade plywood or chipboard
with a 3/4 in. thickness is recommended.
Mark holes on board where planer is to be mounted using
holes in planer base as a template for hole pattern.
Follow last three steps in section Mounting Planer to
Workbench.
If lag bolts are used, make sure they are long enough to go
through holes in planer base and material the planer is being
mounted to. If machine bolts are used, make sure bolts are
long enough to go through holes in planer base, the material
being mounted to, and the lock washers and hex nuts.
ASSEMBLY
Fig. 6