


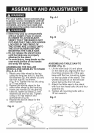
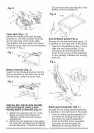
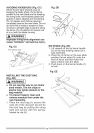

2. Removethearbornut(2)andouter
bladeflange(3).(Fig.T)
3. Placethebladeontothearbor(4)
withthebladeteethpointingforward
tothefrontofthesaw.(Fig.U)
NOTE:Leavetheplasticstriparound
thesawbladeatthistime.Remove
beforeusingthesawforthefirst
time.
4. Makesurethebladefitsflush
againsttheinnerflange.
5. Cleantheouterbladeflange(3)
andinstallit ontothearbor(4)and
againsttheblade.(Fig.T)
6. Threadthearbornut(2)ontothe
arbor,makingsuretheflatsideof
thenutisagainsttheblade,then
hand-tighten.(Fig.T)
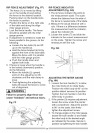
7. Totightenthearbornut(2),place
theopen-endwrench(6)onthe
flatsofthesawarbor(5)tokeepthe
arborfromturning.(Fig.U)
8. Placethebox-endwrench(7)onthe
arbornut(2)andturnclockwise(to
therearofthesawtable).(Fig.U)
9. Donotreplaceinsertuntilafterthe
nextstepofaddingtherivingknife
assembly.
>/
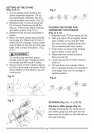
RIVING KNIFE ASSEMBLY
l_ WARNING l
e To avoid injury from an accidental
start, make sure the switch is in
the OFF position and the plug
is disconnected from the power
source outlet.
e Never operate this saw without
the riving knife in the correct
position.
installing the riving knife assembly
(Fig. V, W, W=I)
NOTE: The table insert should be
removed and the blade raised to its
highest position before proceeding.
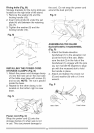
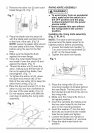
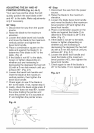
1. Loosen the blade lock handle (1).
Turn and move the handwheel (2)
to 45° on the bevel scale.
2. Tighten the bevel lock handle.
Fig. V
2 1
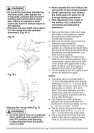
3. Place the riving knife (3) on the
mounting bracket (4) located behind
the saw blade. The two pins (5) on
the bracket should fit into the slot on
the riving knife.
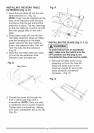
4. Make sure the riving knife (3) is in
its highest position.
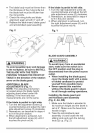
5. Insert the set plate (6) making sure
the two outer holes fit into the two
pins on the mounting bracket.
6. Insert the washer (7) into the lock
lever (8) and insert into the middle
hole the set plate and tighten.
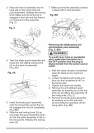
7. Loosen the blade lock handle (1)
and return the blade to 0° and lock.
8. Place the table insert back into
position.