


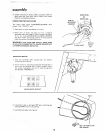

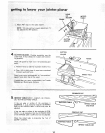
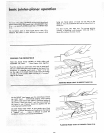

b. Before tightening fence lock knob, hold fence
down on outfeed table so it does not rock.
c. 90° Fence Stop positions fence square to tables.
To tilt fence, loosen the two knobs and pull the
stop out. Tilt to desired angle and tighten both
knobs.
d. To set fence at 90 ° to tables, loosen the two
knobs, tilt fence so the stop springs back ifito
place. Tilt fence back so the stop rests on the
,1
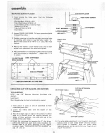
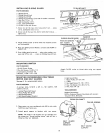
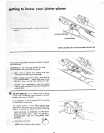
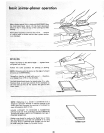
3. FENCE TILT SCALE. Indicates the angle of the
fence to the tables. When the 90 ° fence stop is cor-
rectly adjusted, the fence will be 90 ° to the table and
the scale wil! read 90 °,
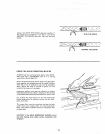
To check for squareness, place an accurate square on
infeed table and check fence while locked at 90 °
position. MAKE SURE 90 ° STOP IS AGAINST
SLIDE BRACKET.
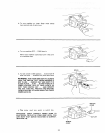
If fence is not square to table;
a. Slightly loosen fence lock knob and guard lock
knob.
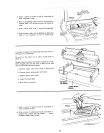
table and tighten both knobs.
e. 45 ° Fence Stop positions the fence at 45 ° to the
tables.
f. To tilt fence to 45 ° loosen the two knobs, pufl
90 ° stop out, tilt fence so the 45 ° stop rests on the
tab{e
g. Hold fence down on outfeed table and tighten the
two knobs.
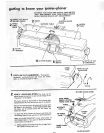
...-..-FENCE TILT SCALE
FENCE
FACE
SQUARE tNFEED
TABLE
CUTTER
GUARD
b,
c_
d.
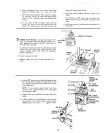
Loosen 90 ° stop screw with small screwdriver and
turn knurled sleeve which will cause fence to tilt.
Turn sleeve in either direction until fence is square
with infeed table.
NOTE: If you cannot square fence by turning
knurled sleeve, loosen three screws "A" and adjust
fence square to table.
Tighten 90 ° stop Iockscrew and both fence lock
knobs,
If 90 ° reading on tilt scale does not line up with
top surface of the slide bracket, loosen screws
holding scale and move _t . , . tighten screws.
450 STO_
KNURLED _'_
13
SCALE
ADJUSTING
SCREW
LOCKSCREW
. TILT
, SCALE
_-"7.-.,._._ k" 90 ° STOP
BRACKET