


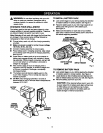
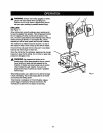

INSTALLING BITS
• Place thedirectionof rotationcelector incenterposition.
See Figure5. Thiswill turnoffthe powertoyourdrill.
• Open or close the chuck jaws to a point where the
opening is slightlylargerthan the bitsize you intendto
use. Also,raisethe frontof your drillslightlyto keep the
bitfrom fallingout of the chuckjaws.
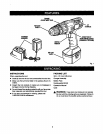
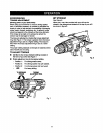
• lnsert yourdntl bit intothe chuck the full lengthofthe
Jaws.See Figure 9.
RELEASE
(UNLOCK)
CHUCKBODY
GRIP
(TIGHTEN)
CHUCKCOLLAR
Fig. 9
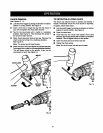
• Tighten the chuck)awson the drillbit.To tighten,grasp
and hold the collar of the chuckwith one hand, while
rotatingthe chuck body withyour other hand.
Note: Rotatethe chuckbodyinthe directionof thearrow
marked GRIP to tightenthe chucklaws.
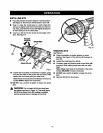
• DO NOT use a wrench to tighten or loosen the chuck
laWS.
A WARNING: Do notinsertdrillbitinto chuckjaws
and tightenas shown in Rgure 10. This couldcause
drtUt_t to be thrown_mmddt_rasu_ng inpasstbls
serious personalinjuryor damage tothe chuck.
Fig. 10
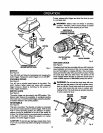
REMOVING BITS
See Figure2.
• Place the directionof rotation selectorIncenter
posit_on.See Figure3. This will turn off the power to
your ddlL
• Loocenthe chuck.jawsfromdfitlbit.
• To loosen:grasp and holdthe cellar of the chuckwl_
one hand, whi_erotatingchuckbodywithyour other
hand.
Note: Rotatechuckbody inthe directionof the arrow
marked RELEASE to_oosanchuckjaws.
• DO NOT use s wrenchto tightenor loosenthe chuck
jews.
• Remove ddllbitfrom chuck Jaws.
12