


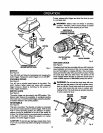

WARNING:Donot allow familiaritywithyour drill-
df',verto make you careless.Remember thata
carelessfraction of a secondis sufficientto _nffict
severe Injury.
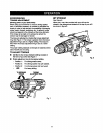
CHARGING YOUR DRILL-DRIVER
The battery pack forthis tool has been shippedIn e low
charge condition to preventpassible problems.Therefore,
you should charge It at least 6 hourspdorto use.
Kote: Batterieswillnot reach furlchargethe firsttimethey
are charged. Atlowseveral cycles (drillingtoltowedby
recharging)forthem to tullycharge.
• Charge batterypack only withthe chargingassembly
provided.
[] Make sure power supply Is normal house voltage,
120 Volts, 60 Hz, AC only.
• Connectchargingassembly to powersupply.
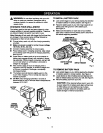
• Place batterypack In chargingassembly.Align raised
rib on battery pack withgroovein chargingassembly.
See Figure2.
• Press downon batterypack to be sure contactson
batterypack engage properlywith contacts incharg-
ing assembly, When pmpedyconnected,red lightwill
turn on and remain on untilbatteryis removedor
chargeris unplugged.
• After normalusage, 3 hoursof chargingtime is
required to betullycharged.A minimumchargetime
of 6 hours is requiredto rechargea completely
dischargedbattery.
• The batterypack will becomeslightlywarm to the
touch while charging.This isnormaland does not
indicatea problem.
• DO NOT place chargingassemblyin an ares of
extreme heat orcold. It willwork bestat temperatures
between 50°F-100°F.
CHARGE
INDICATOR
LIGHT(teD)
,ASSEMBLY
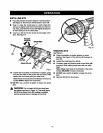
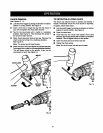
TO INSTALL BAI"I'ERY PACK
• LockswitchIdggar on your drillby placingthe direction
of ro_a'_onselectorin centerposition.Sea F')gure3.
• Place file batterypack inyour drill.Align raised rib on
batterypack withgroovein drill'sbattery pert.
See Figure4.
• MBJCesurethe _tches on each sideof your battery
pack snap in place and that batterypack is secured in
ddti before beginningoperation.
DIRECTIONOF
FLOTATIONSELECTOR
(i
CENTERPosmoN
(LOCiO swrrcH'reuG
Fig. 3
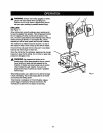
TO REMOVE BAT'rERY PACK
• Lockswit_ tr(ggaron your drill by placing the direction
of rotationselector in center pealtion. See Figure3.
II Looatelatchesonsldeofbatterypeckanddeprsesboth
sidesto releasebatterypack [mmyourdrilLSee Figure6.
• Remove batterypack fromyour ddti.
CAUTION: When placingbattery pack in your dritl,
be sure raised db on batterypeck alignswithgroove
in ddll"Bbattery pert and latches snap in place
properly.Improperassemblyof battery pack can
cause damage to internalcomponents.
F_g.2
9