


-26-
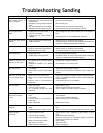
SYMPTOM
Deep sanding grooves or
scars in workpiece.
Grains rub off the belt
easily.
Sanding belt clogs quickly
or burns.
Burn marks on workpiece.
Glazed sanding belt.
Workpiece frequently gets
pulled out of your hand.
Motor will not start.
Motor will not start; fuses
or circuit breakers blow.
Motor overheats.
Motor stalls (resulting in
blown fuses or tripped
circuit).
Machine slows when
operating.
Machine vibrates
excessively.
POSSIBLE CAUSE
1. Sanding belt grit is too coarse for the
desired finish.
2. Workpiece is being sanded across the
grain.
3. Too much sanding force on workpiece.
4. Workpiece held still against the belt.
1. Sanding belt has been stored in an
incorrect environment.
2. Sanding belt has been folded or
smashed.
1. Using too much pressure against belt.
2. Sanding softwood.
1. Using too fine of sanding belt grit.
2. Using too much pressure against belt.
3. Work held still for too long.
1. Sanding wet stock.
2. Sanding stock with high residue.
1. Not supporting the workpiece against
the stop.
2. Starting the workpiece on a leading
corner.
1. Low voltage.
2. Open circuit in motor or loose connec-
tions.
1. Short circuit in line cord or plug.
2. Short circuit in motor or loose connec-
tions.
3. Incorrect fuses or circuit breakers in
power line.
1. Motor overloaded.
2. Incorrect usage of machine.
3. Air circulation through the motor
restricted.
1. Short circuit in motor or loose connec-
tions.
2. Low voltage.
3. Incorrect fuses or circuit breakers in
power line.
4. Motor overloaded.
1. Applying too much pressure to work-
piece.
2. Undersized circuit or using ext cord.
1. Stand not stable on floor.
2. Incorrect motor mounting.
3. Incorrect sanding belt tension.
4. Weak or broken tension spring.
5. Idler roller is too loose.
6. Broken/defective sanding belt.
CORRECTIVE ACTION
1. Use a finer grit sanding belt.
2. Sand with the grain.
3. Reduce pressure on workpiece while sanding.
4. Keep workpiece moving while sanding on the belt.
1. Store sanding belt away from extremely dry or hot tempera-
tures.
2. Hang sanding belt or store unfolded and unstacked.
1. Reduce pressure on workpiece while sanding.
2. Use different stock. Or, accept the characteristics of the stock
and plan on cleaning/replacing belts frequently.
1. Use a coarser grit sanding belt.
2. Reduce pressure on workpiece while sanding.
3. Do not keep workpiece in one place for too long.
1. Dry stock properly before sanding.
2. Use different stock. Or, accept the characteristics of the stock
and plan on cleaning/replacing belts frequently.
1. Use back stop to support workpiece.
2. Start workpiece on a trailing corner.
1. Check power line for proper voltage.
2. Inspect all lead connections on motor for loose or open con-
nections.
1. Inspect cord or plug for damaged insulation and shorted wires.
2. Inspect all connections on motor for loose or shorted terminals
or worn insulation.
3. Install correct fuses or circuit breakers.
1. Reduce load on motor.
2. Reduce the applied load on the machine.
3. Clean out motor to provide normal air circulation.
1. Inspect connections on motor for loose or shorted terminals or
worn insulation.
2 Correct the low voltage conditions.
3. Install correct fuses or circuit breakers.
4. Reduce load on motor.
1. Sand with less pressure—let the movement of the belt do the
work.
2. Make sure circuit wires are proper gauge & don’t use ext cords!
1. Secure stand to floor, reposition to level surface, or shim
stand.
2. Check/adjust motor mounting.
3. Make sure tension lever is in tensioning position. Follow belt
tensioning instructions in this manual.
4. Replace spring.
5. Adjust idler roller.
6. Replace sanding belt.
Troubleshooting Sanding