


Df[\cN(/)+('?pYi`[KXYc\JXn
-18-
J<KLG
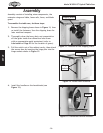
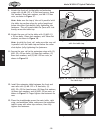
9. Attach the front rail to the table and extension
wings with (4) M8-1.25 x 35 flat head screws, 8mm
flat washers, 8mm lock washers, and M8-1.25 hex
nuts, as shown in Figure 17.
Note: Make sure the top of the rail is parallel with
the table top surface along its entire length and
below the miter slots before fully tightening the
fasteners. This will ensure that the fence will ride
evenly across the table top.
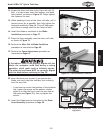
10. Attach the rear rail to the table with (2) M10-1.5
x 25 hex bolts, 10mm lock washers, and 10mm flat
washers, as shown in Figure 18.
Note: As with the front rail, make sure the rear rail
is parallel with the table top and below the miter
slots before fully tightening the fasteners.
11. Secure the rear rail to the extension wings with (2)
M8-1.25 x 35 hex bolts, (4) 8mm flat washers, (2)
8mm lock washers, and (2) M8-1.25 hex nuts, as
shown in Figure 18.
Figure 18. Rear rail attached parallel with
the table top.
x2
x2
Figure 17. Front rail attached parallel
with the table top.
:fjVa
x4
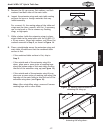
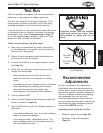
12. Install the extension table between the front and
rear rails with (2) M8-1.25 x 35 hex bolts, (2)
M8-1.25 x 35 flat head screws, (8) 8mm flat washers,
(4) 8mm lock washers, and (4) M8-1.25 hex nuts, as
shown in Figure 19. Finger tighten the fasteners for
now.
13. Place the straightedge across the main table, right
wing, and extension table, make sure the extension
table is even with other top surfaces, then fully
tighten the fasteners.
Figure 19. Extension table installed.
x2
x2
x2