


Df[\cN(/)+('?pYi`[KXYc\JXn
-67-
J<IM@:<
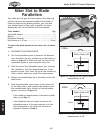
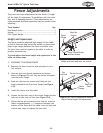
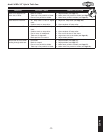
5. Slide the fence up against the right-hand edge of the
miter slot, as shown in Figure 106, then lock it in
place.
6. Examine how the fence lines up with the miter slot
along its length.
— If the fence and miter slot are flush from front
to rear, as shown in Figure 106 (A), proceed to
Step 9.
— If the rear of the fence overlaps the miter slot, as
shown in Figure 106 (B), the fence is misaligned.
Proceed to Step 8.
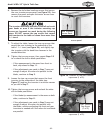
7. Remove the fence, then alternately loosen and
tighten the rear fence set screws in equal amounts
to adjust the rear of the fence until it is parallel
with the miter slot.
8. Loosen both front thumb knobs (see Figure 103 on
Page 65). Tighten the set screws so they just touch
the fence tube, back off the set screws
1
⁄2 turn,
then re-tighten the thumb knobs.
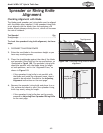
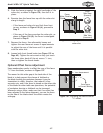
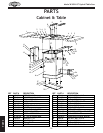
Optional Offset Fence Adjustment
Some woodworkers prefer to offset the rear of the fence
1
⁄64" from the blade, as shown in Figure 107.
The reason for this wider gap at the back side of the
blade is to help prevent the chance of kickback or
the blade burning the workpiece because it may be
inconsistent in width. However, the trade-off is less
accurate cuts, and if the fence is placed on the other side
of the blade for other table saw operations, the potential
of workpiece burning or kickback can be increased.
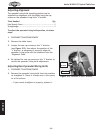
Whenever using a fence, make sure that if an offset has
been adjusted in the fence alignment, you use the fence
on the side of the blade where the offset creates the
wide gap.
Fence
Face
Miter
Slots
Top View
Overlap
Side View
(Incorrect)
Flush
Side View
(Correct)
A
B
Figure 106. Aligning the fence to the
miter slot.
O
O"
(
&-+
<okiXJgXZ\
kfGi\m\ek9`e[`e^
O4PfliD\Xjli\d\ek
Figure 107. Adjusting the fence with an
1
⁄64" offset.