


Df[\cN(/)+('?pYi`[KXYc\JXn
-58-
J<IM@:<
Tilt Stop Collars
The table saw features stop collars that halt the blade tilt
exactly at 45° and 90°. The stop collars have been set at
the factory and should require no adjustments, unless you
notice that your cuts are not accurate.
Note: The tilt scale reads "0" when the blade is 90° to the
table.
Tools Needed Qty
90° Square .......................................................1
45° Square .......................................................1
Hex Wrench 4mm ...............................................1
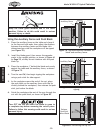
Setting 90° Stop Collar
1. DISCONNECT SAW FROM POWER!
2. Raise the blade as high as it will go, then tilt it
toward 0° until it stops and cannot be tilted any
more.
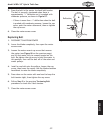
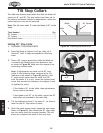
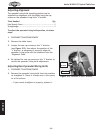
3. Place a 90° square against the table and blade so
it contacts the blade evenly from bottom to top,
as shown in Figure 88. Make sure the square is not
contacting a blade tooth.
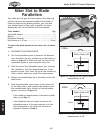
Note: If adjustments are made to the 90° stop
collar in the following steps, make sure the tilt
indicator arrow shown in Figure 89 points to the
0° mark on the scale when the table is at 90°
with the blade. If it is not, loosen the button head
screw that secures the indicator, then adjust it and
re-tighten the screw.
— If the blade is 90° to the table, then adjustments
do not need to be made.
— If the blade is not 90° to the table, adjust the 90°
stop collar and proceed to the next step.
4. Tilt the blade away from 0° by about 5°, so there is
room for the 90° stop collar to move.
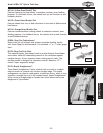
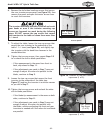
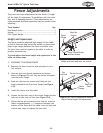
5. Open the motor access cover, loosen the cap screws
shown in Figure 90, then thread the 90° stop collar
one turn away from the trunnion bracket. This will
allow you to square the blade in the next step.
KXYc\
0'JhlXi\
9cX[\
Figure 88. Checking the blade at 90°.
Figure 89. Tilt indicator and scale.
Tilt Indicator
at 0°
Figure 90. 90° stop collar and cap screws.
Trunnion
Bracket
90° Stop Collar
Cap Screws