


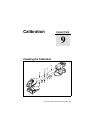


9 Calibration
76 DG711 and DG511 Pipe Laser User Guide
Checking the calibration of your
pipe laser is easy. All you need is
an engineer’s rule and your pipe
laser:
1 Select a level road, parking lot
or field whose rise is not more than
10 cm in 30 m (4 inches in 100 ft).
2 Choose two points (A and B)
about 30 m (100 ft) apart. The
distance does not have to be
measured, but the points must be
found, so mark them well.
3 Set up the pipe laser just behind
the lowest point and rough level.
4 Turn on the pipe laser and let it
warm up for about 10 minutes.
5 Set the grade counter to
0.000%.
6 Aim the laser beam so that it
passes over points A and B. Allow
the pipe laser to self-level.
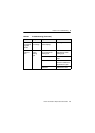
7 Accurately measure the
elevation to the center of the beam
at point A and record the elevation
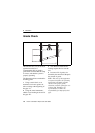
as A1 in a table like the one shown
below:
8 Accurately measure the
elevation to the center of the beam
at point B and record the elevation
as B1.
9 Move the pipe laser behind
point B and aim the laser beam so
that it passes over points A and B.
Allow the pipe laser to self-level.
10 Accurately measure the
elevation to the center of the beam
at point B and record the elevation
as B2.
11 Accurately measure the
elevation to the center of the beam
at point A and record the elevation
as A2.
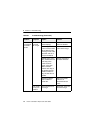
Point A Point B
Second Reading A2 B2
First Reading A1 B1
Difference A2 - A1 B2 - B1
Error in 30 m
(100 ft)
(A2 - A1) – (B2 - B1)
2