


10 ProSpray 3.39
GB
Starting operation
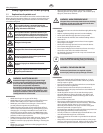
Solid Green
When the pressure indicator is solid green, the sprayer is operating
between 12 MPa (120 bar) and 23 MPa (230 bar). A solid green
pressureindicatormeans:
• Thesprayerisattheproperpressuresettingforsprayingoil-
based and latex house paints
• Thesprayerisoperatingatpeakperformanceatahigh
pressure setting
• Ifthepressureindicatorgoestosolidyellowwhenthe
pressure is set so that it starts at solid green, it indicates one of
thefollowing:
a. Tip Wear Indicator — when spraying with latex or at high
pressure the solid yellow appears. This means the tip is
worn and needs to be replaced.
b. Tip Too Large — when a tip that is too large for the sprayer
is put in the gun, the pressure indicator will turn from solid
green to solid yellow.
c. Fluid Section Wear — if a solid yellow pressure indicator
appears when using a new tip and the pressure is set at
maximum, service may be required (worn packings, worn
piston, stuck valve, etc...).
Service Indicator
The Service indicator is on when the motor is commanded to run.
This indicator is used by service centers to troubleshoot motor
problems.
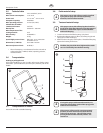
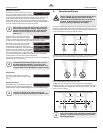
4.3 Pressure control knob settings (Fig. 7)
1. Minimum pressure setting
2. Blackzone–nopressuregeneration
3. Bluezone–pulsatingpressureforcleaning
1
2
3
4.4 Connection to the mains network
Attention
The unit must be connected to an appropriately-
grounded safety outlet.
Before connecting the unit to the mains supply, ensure that the line
voltagematchesthatspeciedontheunit’sratingplate.
The connection must be equipped with a residual current protective
device with INF ≤ 30 mA.
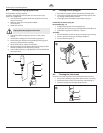
4.5 Cleaning preserving agent when starting-up
of operation initially
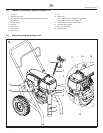
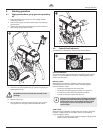
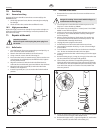
1. Immerse the suction tube (Fig. 8, Item 1) and return hose (2)
into a container with a suitable cleaning agent.
2. Turn the pressure control knob counterclockwise (3) to
minimum pressure.
3. Open the relief valve (4), valve position PRIME
(k circulation).
4. Switch the unit (5) ON.
5. Wait until the cleaning agent exudes from the return hose.
6. Closethereliefvalve,valvepositionSPRAY(p spray).
7. Pull the trigger of the spray gun.
8. Spray the cleaning agent from the unit into an open collecting
container.
1
2
35
4
4.6 Taking the unit into operation with coating
material
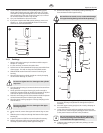
1. Immerse the suction tube (Fig. 8, Item 1) and return hose (2)
into the coating material container.
2. Turn the pressure control knob counterclockwise (3) to
minimum pressure.
3. Open the relief valve (4), valve position PRIME
(k circulation).
4. Switch the unit (5) ON.
5. Wait until the coating material exudes from the return hose.
6. Closethereliefvalve,valvepositionSPRAY(p spray).
7. Trigger the spray gun several times and spray into a collecting
container until the coating material exits the spray gun
without interruption.
8. Increase the pressure by slowly turning up the pressure
control knob.
Check the spray pattern and increase the pressure until the
atomizationiscorrect.
Always turn the pressure control knob to the lowest setting
withgoodatomization.
9. The unit is ready to spray.