


ProSpray 3.39 17
GB
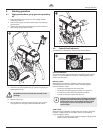
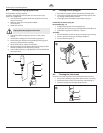
Repairs at the unit
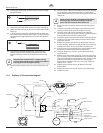
15. Clean all the parts with the corresponding cleaning agent.
Check outlet valve housing (9), outlet valve seat (15), outlet
valve ball (13) and upper ball guide (12) for wear and replace
parts if necessary. If the worn outlet valve seat (15) is unused
on one side, install it the other way around.
16. Carry out installation in the reverse order.
17. If you plan to replace the uid section packings, move on to
section 11.3. If not, reassemble uid section in the reverse
order of how it was disassembled.
10
11
12
13
14
15
9
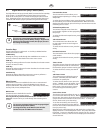
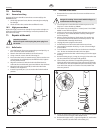
11.3 Packings
1. Remove inlet valve housing in accordance with the steps in
Chapter 11.2, Page 16.
2. It is not necessary to remove the outlet valve.
3. Pull the lever on the underside of the sprayer toward the front
of the sprayer. This will un-clamp the entire uid section.
4. Slide the uid section forward to remove it from the gear
housing.
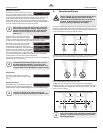
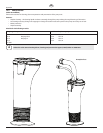
5. Place the uid section cylinder upright in a vise by clamping
on the wrench ats (Fig. 16, Item 1).
Do not over-tighten the vise. Damage to the cylinder
may occur.
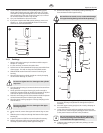
6. Turn the upper housing (2) counterclockwise to loosen it from
the cylinder (3).
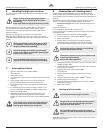
7. Slowly pull down the upper housing (2) just far enough to
expose the extension slider (4) and the connecting pin (5) that
connects the piston rod (6) to the extension slider (4).
8. Push the connecting pin out of the extension slider and piston
rod and remove the piston rod and upper housing.
9. Place the upper housing upright in a vise by clamping on the
wrench ats (7).
Do not over-tighten the vise. Damage to the upper
housing may occur.
10. Usingawrench,removetheuppersealretainer(Fig.16,Item
8).
11. Slide the piston rod (6) out through the bottom of the upper
housing (2).
12. Inspect the piston rod (6) for wear and replace if necessary.
13. Remove the upper support ring (9) and upper packing
assembly (10) from the top of the upper housing (2).
14. Remove the adapter (11) and lower packing assembly (12)
from the bottom of the upper housing.
Be careful not to scratch, score, or otherwise damage
the upper housing during removal of the packings.
7
11
12
2
8
9
10
6
13
14
3
4
1
5
15. Clean the upper housing (2) and cylinder (3-5). Inspect
the upper housing and cylinder for damage and replace if
necessary.
16. Place the upper housing upright (2) in a vise by clamping on
the wrench ats (7).
17. Locate the new upper and lower packings and remove the
pre-form tools. Save the upper packing pre-form tool for use
as the piston insertion tool later in this procedure.
i
Do not remove the pre-form tools from the upper
and lower packings until immediately before they
are installed into the upper housing.
18. Lubricate upper packing (10) and lower packing (12) with
machine grease.