


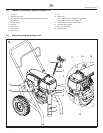


ProSpray 3.39 11
GB
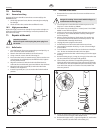
Starting operation
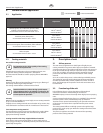
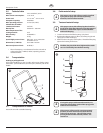
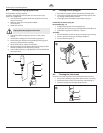
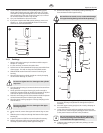
4.7 Digital Electronic Spray Control (DESC)
The Digital Electronic Spray Control (DESC) increases the functionality
of the sprayer. It is installed directly below the pressure control
knob on the control panel. It consists of a display and four function
keys. The display shows various menu screens that allow the user to
customizeandmonitorsprayeroperationusingthefunctionkeys.
SET MPa 23.0
ACTUAL MPa 22.5
Display
Function
Keys
i
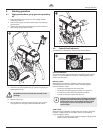
The pressure control knob overrides the Digital
Electronic Spray Control (DESC) settings. Anytime the
pressure control knob is turned, the sprayer pressure
will change accordingly.
Function Keys
The function keys are numbered 1–4. Each key is labeled with an
additional function as well.
#1/Menu Key
Pressing the #1 key scrolls through the available menu screens or
performs a function described on the active menu screen.
#2/g Key
Pressing the #2 key performs a function described on the active menu
screen or increases a value.
#3/h Key
Pressing the #3 key performs a function described on the active menu
screen or decrease a value.
#4/Select Key
Pressing the #4 key selects the active menu screen or performs a
function described on the active menu screen.
Menu Screens
Severalmenuscreensareavailablefortheusertocustomizeand
monitorsprayeroperation.TheyincludeMainScreen,Volume
Pumped,JobVolume,UnitSerial#,Timers,JobTimers,ServiceTime,
Security Code, Prime, and Rapid Clean.
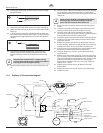
Main Screen
SET MPa 23.0
ACTUAL MPa 22.5
The Main Screen is the default screen for
the control system at sprayer startup.
Pressing the #2 key switches between PSI, Bar and MPa units of
measure. Press the #1 key to scroll through the remaining menu
screens.
i
For sprayers equipped with an nine-language Digital
Electronic Spray Control (DESC):
Pressing the #2 key at the Main Screen switches
between PSI, Bar and MPa units of measure.
Current Select Screen
CURRENT SELECT
SELECT-4MENU-1
The Current Select screen allows you to
toggle between operating in 15 Amp or 20
Amp mode.
To select the Current Select screen, press the #4 key. Pressing the
#2 or #3 allows you to choose the desired mode. When the screen
displays the desired mode, press the #1 key to save and return to the
remaining menu screens.
Volume Pumped Screen
VOLUME PUMPED
SELECT-4MENU-1
TheVolumePumpedscreenshowsthe
total number of gallons or liters sprayed by
the sprayer.
GALLONS X
MENU-1
LITRES X
MENU-1
LITRES-2
GALLONS-2
ToselecttheVolumePumpedscreen,press
the #4 key.
Job Volume Screen
JOB VOLUME
SELECT-4MENU-1
TheJobVolumescreenallowstheuser
to reset a liter counter to track usage on
specic jobs.
GALLONS XXXX
RESET-3MENU-1
ToselecttheJobVolumescreen,pressthe
#4 key.
Unit Serial # Screen
UNIT SERIAL #
SELECT-4MENU-1
TheUnitSerial#screenshowsthesprayers
serial number.
SER # XXXXXXXXXX
MENU-1
ToselecttheUnitSerial#screen,pressthe
#4 key.
Timers Screen
TIMERS
SELECT-4MENU-1
The Timers screen shows the total time the
sprayer has been turned on as well as the
total time the sprayer has been running (pumping).
ON TIME
RUN TIME
XXXX
XXXX
To select the Timers screen, press the #4
key.
Job Timers Screen
JOB TIMERS
SELECT-4MENU-1
The Job Timers screen allows the user to
resetthe“ONTIME”and“RUNTIME”to
track time on specic jobs.
JOB ON X
RESET-3MENU-1
JOB RUN X
RESET-3MENU-1
To select the Job Timers screen, press the
#4key.“JOBON”screenwillappear.Press
#3toreset.Press#1tocontinueto“JOB
RUN”screen.Press#3toreset.Press#1
to scroll through the remaining menu
screens.
Service Time Screen
SERVICE TIME
SELECT-4MENU-1
The Service Time screen allows the user to
set a service time interval (in hours). Below
the set time, the screens shows the current amount of hours on the
sprayer since the last activation of the service timer. To select the
Service Timer screen, press the #4 key.
SERVICE @ XX
RUN HOURS XX
To set the service time, press the #2 (up)
and/or the #3 (down) keys to the desired
time (run hours will increase/decrease in increments of 25 for each
time you press a key).
When the service time interval is set and met by the run hours, the
displaywillshowa“ServiceRequired”screen.Thepumpwillremain
functional. To return to the Main Screen, press the #1 key. Doing so
willresetthe“Service@”and“RunHours”displayedontheService
Screen back to 0.