


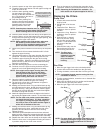


For corners and edges, split the
center of the spray pattern on the
corner or edge and spray vertically
so that both adjoining sections
receive approximately even
amounts of paint.
When spraying with a shield, hold it firmly against the surface.
Angle the spray gun slightly away from the shield and toward
the surface. This will prevent paint from being forced
underneath.
Shrubs next to houses should be tied back and covered with a
canvas cloth. The cloth should be removed as soon as possible.
Titan gun extensions are extremely helpful in these situations.
Nearby objects such as automobiles, outdoor furniture, etc.
should be moved or covered whenever in the vicinity of a
spray job. Be careful of any other surrounding objects that
could be damaged by overspray.
Practice
1. Be sure that the paint hose is free of kinks and clear of
objects with sharp cutting edges.
2. Turn the pressure control knob counterclockwise to its to
its lowest setting.
3. Turn the PRIME/SPRAY valve up to its SPRAY position.
4. Turn the pressure control knob clockwise to its highest
setting. The paint hose should stiffen as paint begins to
flow through it.
5. Unlock the gun trigger lock.
6. Trigger the spray gun to bleed air out of the hose.
7. When paint reaches the spray tip, spray a test area to
check the spray pattern.
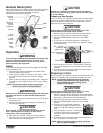
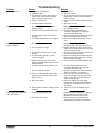
8. Use the lowest pressure setting
necessary to get a good spray
pattern. If the pressure is set too
high, the spray pattern will be too
light. If the pressure is set too
low, tailing will appear or the paint
will spatter out in gobs rather than
in a fine spray.
Cleanup
Special cleanup instructions for use with flammable
solvents:
•Always flush spray gun preferably outside and at least one
hose length from spray pump.
• If collecting flushed solvents in a one gallon metal
container, place it into an empty five gallon container, then
flush solvents.
• Area must be free of flammable vapors.
• Follow all cleanup instructions.
The sprayer, hose, and gun should be cleaned thoroughly
after daily use. Failure to do so permits material to build
up, seriously affecting the performance of the unit.
Always spray at minimum pressure with the gun nozzle tip
removed when using mineral spirits or any other solvent
to clean the sprayer, hose, or gun. Static electricity
buildup may result in a fire or explosion in the presence of
flammable vapors.
1. Follow the “Pressure Relief Procedure” found in the
Operation section of this manual.
2. Remove the gun tip and tip guard and clean with a brush
using the appropriate solvent.
WARNING
CAUTION
WARNING
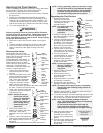
Good spray pattern
Paint tailing pattern
©Titan Tool Inc. All rights reserved. 7
3. Place the siphon tube into a container of the appropriate
solvent. Examples of the appropriate solvent are water for
latex paint or mineral spirits for oil-based paints.
4. Place the return hose into a metal waste container.
5. Move the PRIME/SPRAY valve down to its PRIME position.
6. Turn the unit on and set the pressure to
Turbo PulseClean by turning the pressure
control knob to its CLEAN position in the
red zone.
7. Allow the solvent to circulate through the
unit and flush the paint out of the return
hose into the metal waste container.
8. Turn the unit off by moving the pressure control knob to
the OFF position in the black zone.
9. Move the PRIME/SPRAY valve up to its SPRAY position.
10. Turn the unit on and set the pressure to Turbo PulseClean
by turning the pressure control knob to its CLEAN position
in the red zone.
Ground the gun by holding it against the
edge of the metal container while
flushing. Failure to do so may lead to a
static electric discharge, which may
cause a fire.
11.Trigger the gun into the metal waste
container until the paint is flushed out of the hose and
solvent is coming out of the gun.
12. Continue to trigger the spray gun into the waste container
until the solvent coming out of the gun is clean.
13. Follow the “Pressure Relief Procedure” found in the
Operation section of this manual.
14. Unplug the unit and store in a clean, dry area.
Do not store the unit under pressure.
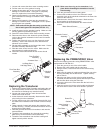
Cleaning the Spray Tip
1. Flush the gun with solvent immediately after the work is
completed.
2. Oil the retractor pins to prevent them from seizing up.
Should the spray tip become clogged, reverse
the spray tip with the lever and pull the trigger.
Once the obstruction comes out of the spray
tip, release the trigger, reverse the spray tip
back to the spray pattern setting, and resume
spraying.
Do not attempt to clean the tip with your finger.
Do not use a needle or other sharp pointed instrument to
clean the tip. The hard tungsten carbide is brittle and can
be chipped.
WARNING
CAUTION
NOTE: For long-term or cold weather storage, pump
mineral sprits through the entire system.
For short-term storage when using latex paint,
pump water mixed with Titan Liquid Shield Plus
through the entire system (see the Accessories
section of this manual for part number).
WARNING