


1–4 975-0468-01-01
This guide for use by qualified installers only
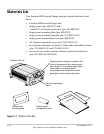
Installation Tools and Materials
You will need the following to install the Freedom HW:
❐ Wire stripper
❐ Mounting screws or bolts
❐ #2 Phillips screwdriver
❐ Wrench for DC terminals (1/2 inch or 13mm or adjustable)
❐ AC cable (i.e. 2-conductor-plus-ground cable), sized appropriately
for load and application
❐ Wire nuts or crimp connectors for AC wire and appropriate tools
❐ DC cable, sized appropriately for load and application
❐ Lugs for DC cables to fit 8 mm (5/16 in.) DC stud terminals) as well
as appropriate tools (e.g. crimping tool)
❐ AC and DC disconnects and over-current protective devices
High Level Overview of Installation Steps
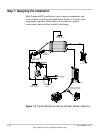
Installing the Freedom HW includes the following steps.
1. Ensure that AC and DC power are both OFF.
2. Mount the inverter securely and permanently in one of the acceptable
orientations.
3. Connect the Equipment Grounding Terminal to the equipment ground
bus.
4. Connect the AC input wiring to the AC source panel.
5. Connect the AC output wiring to the AC load panel.
6. Connect one end of the DC negative cable to the negative of the
battery, and the other to the negative terminal of the unit.
7. Install an appropriately sized fuse and DC disconnect in the positive
cable.
8. Connect the DC positive cable to the positive of the battery, and to the
positive terminal of the unit.
9. Close the DC disconnect switch.
Do not proceed with installation until you have read “Safety Instructions”
on page 1–3.