


Basic Installation Procedures
975-0468-01-01 1–25
This guide for use by qualified installers only
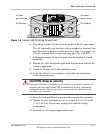
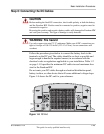
10. Install the lock washer and nut that are supplied with the inverter.
Tighten the nut to a torque of 108–120 in-lbf (12.2–13.6 N-m). Make
the connection snug enough so the ring terminal does not move
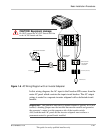
around on the DC terminal, but do not overtighten. See Figure 1-9,
“DC Cable Connections” on page 1–26.
11. Before proceeding, double check that the cable you have just installed
connects the positive DC terminal of the inverter to the disconnect/
battery selector switch, fuse holder, and that the other end of the fuse
holder is connected to the positive terminal of the battery.
.
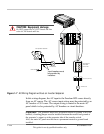
12. Connect the cable from the negative post of the battery to the negative
DC terminal of the inverter.
CAUTION
Loose connections cause excessive voltage drop and may cause overheated wires
and melted insulation.
CAUTION
Do not over-tighten the nut on the DC input terminals. Damage to the DC input
terminals may result.
The maximum torque setting is 120 in-lbf (13.6 N-m).
CAUTION: Reverse polarity
DC power connections to the Freedom HW must be positive to positive and
negative to negative.
A reverse polarity connection (positive to negative) will blow a fuse in the
inverter and may permanently damage the inverter. The fuse is not user
replaceable and the inverter may need to be returned for servicing.
Damage caused by a reverse polarity connection is not covered by your warranty.
WARNING: Explosion or fire
Do not complete the next step if flammable fumes are present. Explosion or fire
may result if the disconnect/battery selector switch is not in the off position.
Thoroughly ventilate the battery compartment before making this connection.