


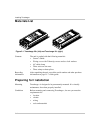


Installing Truecharge+
2–10
To install the DC wiring:
1. Plan the route the DC wires will follow trying to make it as short as
possible. Measure the required wire length, and cut the cables. Allow
some extra length for connections and to provide slack in the wires.
It is possible that the connection to the battery negative circuit may
not actually be right at the battery. For example, on boats the proper
location for the negative connection is often at an engine negative bus
or a DC negative bus. If in doubt, consult the boat schematics.
2. Identify the positive wires, by using color-coded wire or by marking
both ends of the wire with colored tape or similar kind of marking.
Repeat with a different color for the negative. Most installation codes
recommended color codes, with the positive usually being red and the
negative being black.
mz
3. Install the DC circuit breakers or fuses in the battery positive circuits
close to the battery.
4. Route the wiring to the batteries and to the charger, but don’t connect
it yet. Try to avoid routing wiring through an electrical distribution
panel, battery isolator, or other device that will add additional voltage
drops.
5. Strip 5/16 in (8mm) of insulation from the ends to be connected to the
charger.
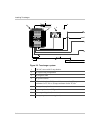
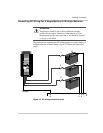
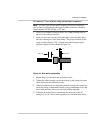
6. Fully insert each positive wire into the positive terminal on the
charger (Figure 2-3, 1, 2, 3). Make sure there are no stray wire strands
protruding from the terminal. Tighten the connector (20 in-lbs torque)
and test that the wire is secure. Repeat this step for up to three
batteries or battery banks.
7. Connect the positive cable from the positive wire terminals on the
charger to the battery fuse or breaker, which should be installed on the
battery positive terminals (Figure 2-3, 4, 5, 6).
Leave the DC disconnects or breakers in the Off position until
installation is complete. Leaving them off helps prevent sparking
when you actually make the connections.
Note: You may find it helpful to label each cable, associating it with the battery
bank it is connected to. For example, Bank 1 (–), Bank 1 (+), Bank 2 (–) and so on.