


Installing Truecharge+
2–11
8. Before proceeding, carefully check the wiring polarity – make sure
the positive on the charger is going to the positive on the batteries
(fuse or breaker) and make sure the negative on the charger is going
to the battery negative terminal (or engine negative bus or DC
negative bus). Do not reverse the connections.
If you reverse the polarity of any one of the DC connections, the
internal fuse for that output bank opens. A qualified technician must
replace this fuse for that bank to function. The other banks should
continue to function normally.
.
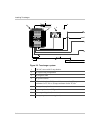
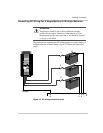
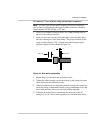
9. To make a single battery bank connection:
• Connect the negative cable to the battery negative terminal
• Fully insert the negative wire into the negative terminal on the
charger (Figure 2-3,14). Make sure there are no stray wire strands
protruding from the terminal. Tighten the connector (20 in-lbs
torque) and test that the wire is secure.
10. To make multiple battery bank connections using a DC negative bus:
• Connect up to three negative cables to the DC negative bus or
engine negative bus (Figure 2-3, 7,8,9), one for each battery bank.
• Connect each negative cable to the battery negative terminal
(Figure 2-3, 10, 11, 12)
• Connect a negative cable from the DC negative bus to the negative
terminal on the Truecharge+ (Figure 2-3, 13, 14).
11. Fully insert the negative wire into the negative terminal on the
charger (Figure 2-3, 14). Check all connections for tightness and to
ensure the conductors are fully inserted in their terminals with no
stray wire strands protruding. Tighten the connector (20 in-lbs torque
recommended) and test that the wire is secure.
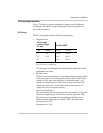
Connecting to AC Wiring
To connect AC wiring:
1. Make sure the AC source circuit is disconnected by turning off the
breaker feeding the circuit, unplugging from shorepower and
disconnecting any other power sources such as a generator.
2. Plan the routing the AC wiring will follow from the source (usually a
15 amp breaker in an AC distribution panel) to the charger. Measure
the required length of three-conductor No. 14 AWG wire, and cut it.
Allow some extra length for connections and to provide slack.