


Installing the XC Series
975-0187-01-01 2–7
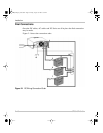
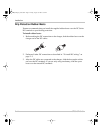
Mounting the Remote Display
To accommodate the charger mounting orientation, the remote display can be
removed and turned 180 ° for readability. If you intend to mount the display
remotely, up to 20 m (65 ft), remove the display before mounting the charger and
secure the blank plate to cover the display socket on the unit.
To remove the display:
1. Unplug the display cable from the telephone-type connector on the back of the
unit.
2. Release the display cable from the retaining clips on the underside of the unit.
3. Remove the remote display from the charger and read and then remove the
warning label that is attached to it.
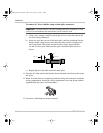
To secure the display or blank plate on the unit:
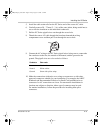
1. Choose the display orientation that is appropriate for the charger orientation.
2. Remove the adhesive backing on the back of the display or blank plate .
3. Line up the display or blank plate with the display socket, making sure it is in
the chosen orientation.
4. Firmly press the flanges in place. Do not press in the middle of the display.
5. Route the display’s North American style telephone-type cable under the unit
and plug the cable into the bottom connector on the rear panel of the unit.
WARNING: Shock hazard
Even if you intend to leave the remote display in the shipped orientation in the XC Series,
you must remove the remote display and secure it in place by removing the non-stick
backing on the rear and pressing the remote display flanges in place. If you do not use the
non-stick backing, the XC Series will not be drip protected.
CAUTION
Ensure you are placing the display in the correct orientation before removing the adhesive
backing. The adhesive tape for attaching the remote is extremely strong and you may be
unable to remove it without damaging the display or other equipment.
XC_Charger_Owner.book Page 7 Friday, August 12, 2005 3:23 PM