


Configuring the XC Series
975-0187-01-01 2–15
Configuring the XC Series
Once the charger is connected to a battery on bank 1 or to AC, it is live and it may
be configured. There will be a short delay of about 15 seconds before the remote
display begins reporting. The remote display will use this time to query the charger
for the current operating conditions.
If AC was already applied, ensure that the charger is in on by pressing
ON/STANDBY
if necessary.
To configure the battery bank type:
1. Press and hold
MODE until (setup) is displayed.
2. Press
TYPE to select the battery type configuration programming mode.
The XC Series will default to Bank 1 and will show the present battery type
setting.
3. Press
BANK repeatedly to select which bank you are setting up. The bank
indicator light will illuminate to show which bank has been selected.
4. Press
TYPE repeatedly to select the battery type for each bank. When you have
selected a battery type that is different from the present configuration, the bank
indicator light flashes.
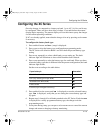
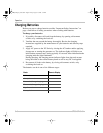
Set the
TYPE according to the table below:
5. Press and hold
ON/STANDBY until is displayed to store the selected battery
type. If is displayed, verify that you are setting the correct battery type and
try again.
6. Repeat steps 1 through 4 for all banks attached to the XC Series. Each time
is displayed for a newly programmed battery type, the charger exits the
programming mode.
7. At any time during setup, you can press
ON/STANDBY once to cancel the current
change and return to charging or battery monitoring.
If your battery is then select
Flooded Lead Acid (has removable caps intended for refilling)
GEL (any sealed type except AGM)
Absorbed Glass Mat (AGM)
Lead Calcium
Custom (if pre-configured at factory)
XC_Charger_Owner.book Page 15 Friday, August 12, 2005 3:23 PM