


6 720 608 263
8
Installation instructions
3 Installation instructions
3.1 Introduction
Please follow these instructions. Failure to follow
instructions may result in:
B Damage or injury.
B Improper operation.
B Loss of warranty.
If you are unable to perform the tasks required to install
this heater properly, please contact a locally licensed
plumber or gas technician.
Please contact Bosch Water Heating with any
questions.
3.2 Proper location for installing your
heater
Carefully select the location of the water heater. For
your safety and for proper heater operation, you must
provide combustion air to the heater and a proper
exhaust vent system.
Follow the guidelines below:
B 1. Locate the heater where venting, gas and
plumbing connections are feasible and convenient.
B 2. The hot water lines should be kept short to save
energy. Centrally locating the water heater is
recommended to keep hot water distribution times
even throughout the structure. It is always best to
have hot water lines insulated.
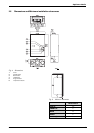
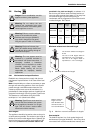
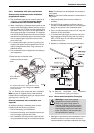
3.3 Heater placement and clearances
The 2400 E is design certified for installation on a
combustible wall (see 3.4 Mounting installation)
provided the floor covering below the heater is
noncombustible. For installations in an alcove or closet,
maintain the minimum clearances to combustible and
non-combustible materials listed below. See also Fig. 5.
A. Top 12 inches (306 mm)
B. Front 1 inches (25 mm)
C. Back 0 inches
D. Sides 1 inches (25 mm)
E. Bottom 12 inches (306 mm)
Clearances from any exhaust vent pipe are dependent
upon the clearance requirements of the stainless steel
vent pipe manufacturer. Single wall stainless steel
(AL29-4C) vent pipe (vent type rated for Category III
appliances) must be used when exhaust venting this
appliance. See 3.6 Venting.
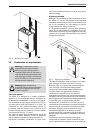
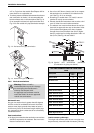
3.4 Mounting installation
B Secure the wall mounting bracket provided with the
heater to a wall surface.
If wall is sheathed with plasterboard, it is recommended
that two support boards, either 1”x4” or 1/2" (minimum)
plywood first be attached across a pair of studs. Then
attach the heater’s bracket to the upper support board.
The heater should be kept level on the wall surface. See
Fig. 6.
Warning: The water in this water
heater is cold and always remains cold
except for the times the burners are on.
In the event of power outage during
freezing temperatures, it is
recommended that the heater be
drained.
See chapter 5.5 “Winterizing” for
draining instructions.
Warning: Flammable materials,
gasoline, pressurized containers, or any
other items or articles that are potential
fire hazards must NOT be placed on or
adjacent to the heater. The appliance
area must be kept free of all
combustible materials, gasoline and
other flammable vapors and liquids.
Warning: The water heater must be
installed in a conditioned space where
temperatures will not fall below 36F.
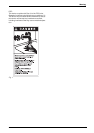
Warning: before starting installation:
B check that there are no loose parts
inside the appliance
B check the gas type of the heater
matches the gas supply you will be
connecting the heater
B ensure that gas pipe, gas valve, mixer,
fan and burner have no damage and are
properly fitted.
i
Front cover should be removed (see
instructions on page 5) in order to inspect
components visually.
Warning: Do not install this appliance
on a carpeted wall. The heater must be
mounted on a wall using appropriate
anchoring materials.